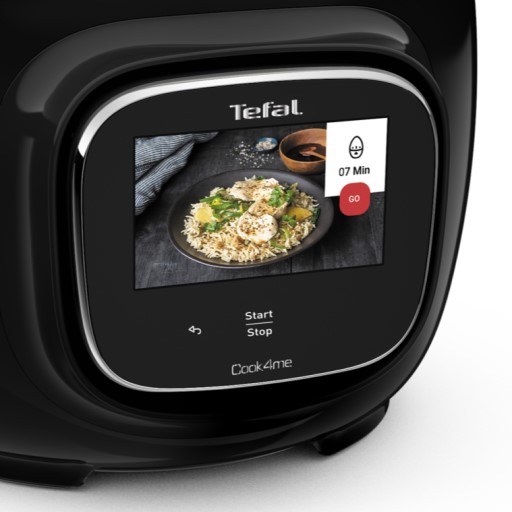
Take your cooking into a whole new level with touchscreen control and onscreen cooking guides
Cook4me Touch is a connected revolution for your kitchen. With visual cooking guides and advanced connectivity you’ll be in touch with your inner chef in no time. It walks you through the 400+* specially created, pressure cooking recipes, for endlessly delicious, healthy dinners including meals cooked in 10 mins or less Use the large, tiltable, waterproof screen to choose a recipe, Cook4me adjusts quantities, time and temp for perfect results, effortlessly. It gives you all the step-by-step guidance needed right there on screen. If you like to go solo and use manual settings, that’s easy too. Even clean-up is easy, the 6L, six portion bowl is non-stick and totally dishwasher safe. Plus, the ‘In My Fridge’ and ‘Shopping List’ features make meal planning a doddle. Connect your device to wifi and to your smartphone using the app. You can get new and seasonal recipes, make recipe libraries, favourites and shopping lists, monitor the progress of your cooking from out of the room, or even suggest recipes to someone while you’re out of your home. The Cook4me Touch takes pressure-cooking further than ever with plenty of other clever touches too. Like auto-release to save hands from hot steam, cool-touch handles, a hinged lid to avoid worktop drips. *requires connection to app **150 recipes, without preparation time
Essentials
Touchscreen Display
Experience the future of cooking with the large, tiltable, waterfproof screen
Simple operation
Automated steam release, cool-touch handles and a hinged lid for safe and easy handling
13 cooking modes
Including Low/high/express pressure-cook (50% faster than Cook4me +), variable steam, stir fry, stew, plus reheat and keep-warm
Connected versatility with app
250 built-in recipes, plus 300+ more on the free Tefal app, for stress-free meal planning
Family friendly
XL 6L cooking bowl – great for feeding all the family or for batch cooking
Fuss-free cleaning
Non-stick and dishwasher-safe cooking bowl and basket for quick and easy cleaning
Adjust by servings
Set your recipe based on the number of people joining you for the meal—2, 4 or 6—and the ingredients will automatically be adjusted, for easier cooking every day.
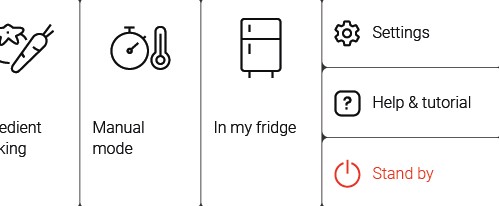
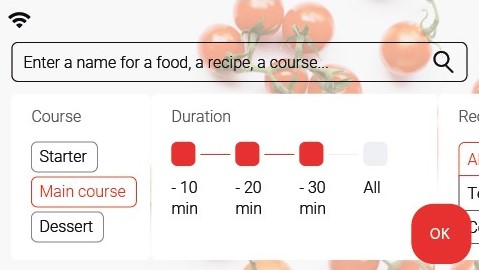
Everyday inspiration
Searching for recipes is fast and easy. Simply search by filter (type of dish, cooking time, number of guests, etc.) or by what you have in your fridge!
On screen (with text + photos + videos) & on mobile device app
Numbers of cooking program
13 programs
Number of built-in recipes
Unlimited with WIFI connection
Product type
Smart multi pressure cooker (incl. guided recipes)
Max pressure level (kPa)
100kPa (EXPRESS =Up to 6x faster than pot cooking)
Pressure cooking
Yes, express mode
Numbers of serving
Up to 6 people
Bowl capacity
6
L
Usable bowl capacity
4
L
Connected
Yes, WIFI (latest recipes & features)
Built-in recipes directly on device screen
Yes
Application
Yes, Tefal app (available depending on country)
Automatic cooking programs
3 Pressure cooking levels: EXPRESS (ultra fast), High (fast), Low (delicate)
2 Levels of steam cooking (vegetables, fish, yogurt...): Boost, Gentle
3 Levels of browning (meat...): High, Medium, Gentle
3 Levels of simmering (for stews, risotto...) : Hi
Delayed start
Yes (Choose exactly when you want to eat)
Airfring function
Yes with additionnal "Turbo Crisp" accessory sold separatly
Manual mode
Yes
Cooking by ingredient (grains, vegetable, meat & seafood)
Yes, select your ingredient and get the perfect cooking result
Keep warm
Automatic
Accessories
Steam basket
Compatible accessories
Transport bag XA6078
Cooking pot XA6020
6 Glass jars XA6060
Cake mold XA6090
Conservation lid XA6120
Airfryer lid (Extra Crisp) EY1508
Depending on the country
Control panel
Rotary selector
Tilting screen
Yes
Reproportion by number of servings
Yes, for 2, 4 or 6 people
Adjustable recipes by ingredients you have at left at home
Yes, "In my fridge" function directly on the product
Allow multi-layer cooking to cook a full meal at once
Your account, to be created from the app, allows you to benefit from additional services related to the interaction of your app with your product: • Find the recipes saved in your notebooks and favourites directly on the robot's screen. • Follow remotely the progress of the recipe on your product and receive recipe notifications. • Display on your product a recipe that you have selected in the application.
Our products are compatible with all operators and the majority of the boxes on the market. You can connect your product to any WEP, WPA and WPA2 type Wi-Fi on the 2.4GHz frequency band.
If your Wi-Fi network is not visible on the product, it is possible that 2.4GHz Wi-Fi is not enabled on your box. Most boxes allow you to activate it. Consult your operator's FAQ to find out how to do this.
Warning: Your product cannot connect to a 5GHz Wi-Fi. Wi-Fi with a password containing special characters will not work as well as open Wi-Fi (not requiring a password).
From the home page of your device, go to "Settings" and select "Associate an account". • Download the application on your smartphone from the Google Play store or the App Store. • From the app, add the product you own and then create an account or sign in. • An association code is generated. Enter it in your application.
Even if your product doesn't need a very fast WiFi connection to work, the received WiFi signal must still be stable. If the screen displays 'Loading Error' you can move the product closer to your box or add a WiFi repeater (see FAQ 'I don't have WiFi access in my kitchen').
If your product loses the WiFi connection during a recipe, you will be able to finish your recipe without any inconvenience. However, the videos of that recipe will no longer be accessible until the connection is re-established.
If the WiFi connection is interrupted during an update, this cannot be completed. Your product will be able to reboot to its current version and this update will be rescheduled the next time you start it.
If your smartphone loses internet connection (WiFi or 4G) during a recipe it will have no impact on your product which will be able to execute the recipe without any problem. You will simply no longer be able to follow the progress of the recipe remotely on your smartphone and you will no longer receive notifications about the end of a step or the addition of an ingredient.
In "Settings" on the right side of your home screen, you need to choose "WiFi Settings" and "Enable WiFi". Then select your WiFi network and enter your password.
Your product can only be associated with one account. However, any application that is connected to this account can interact with this product. If you have a tablet and a smartphone, or if other members of your household want to interact with your product, they can simply connect their application using your account.
As soon as an update is available, your product when it connects to the WiFi will suggest you to do the update.
Some updates are priorities for security reasons and you will need to perform them before you can use your product. Others may be delayed. You can then perform them now or later by going to your product's settings.
If an update fails, you can download it again. If despite several attempts you are unable to install it, move the product closer to your box, the connection from your kitchen may be too weak to download it. If the update fails even close to your box, please contact our customer service.
Yes, your device can be used with several smartphones or tablets, even if your product can only be associated with a single account. So if you own a tablet and a smartphone, or if other members of your household wish to interact with your product, they simply need to connect their application using your account.
If your product is associated with your user account, you will be able to follow the progress of your recipe on your application. You will also receive end-of-stage or alert notifications. If you do not receive these notifications, please enable them in your iOS or Android settings.
To remotely send a recipe from your application to your product, simply open a recipe and click on the icon with your product. If your product is on standby, it will open on your product as soon as it connects to Wifi. If the product is running, it will be displayed in a few seconds if your product is not already making another recipe.
Place your device on a flat, stable surface. To obtain an optimal connection between your device and your box, it is recommended to position your device in a place where the Wifi signal received from your box is strong. You can test the connection by positioning your smartphone at the location of your product to see if the WiFi signal received at that location is strong enough. If the connection is interrupted (connection symbol crossed out), please bring your device and your box closer together to reestablish the connection. The presence of the fixed connection indicator (application or product) ensures that your devices are connected.
There are three different icons that appear one after the other.
Your product is not connected to the WiFi (via the modem or via a mobile phone). Therefore, you can only access the 250 recipes contained in your product. We advise you to check that WiFi is activated on your modem/phone and to get closer to your modem/phone. We remind you that your product cannot connect to a 5GHz WiFi network, a WiFi network with a password containing special characters, as well as open WiFi networks (which do not require a password).
Your product is connected to the WiFi (via modem, mobile phone,...), but not connected to the database. Therefore, you can only access the 250 recipes contained in your product.
Your product is connected to the WiFi (via modem, mobile phone,...) and to the database. As a result, you can access more than 1,500 recipes.
The Cookeo team is constantly working to improve its recipes catalogue. The automatic update of your product allows you to always cook with the latest version available. So, even when you are not connected via WiFi, you will have access to the latest version of the recipes embedded in your product.
The WiFi connection is necessary to benefit from all the functionalities of your product and updates. Nevertheless, 250 recipes are registered in your device and available offline. To extend your WiFi network to your kitchen, you can bring your box (internet access point) closer to your kitchen or add a repeater that will extend the range of your WiFi network. There is no need of internet access for the recipes embedded in your product.
You must create an account and log in to your app to access this feature.
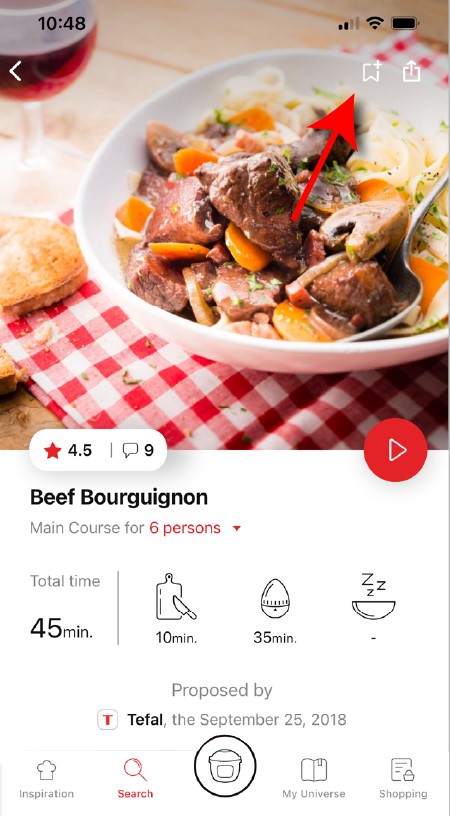
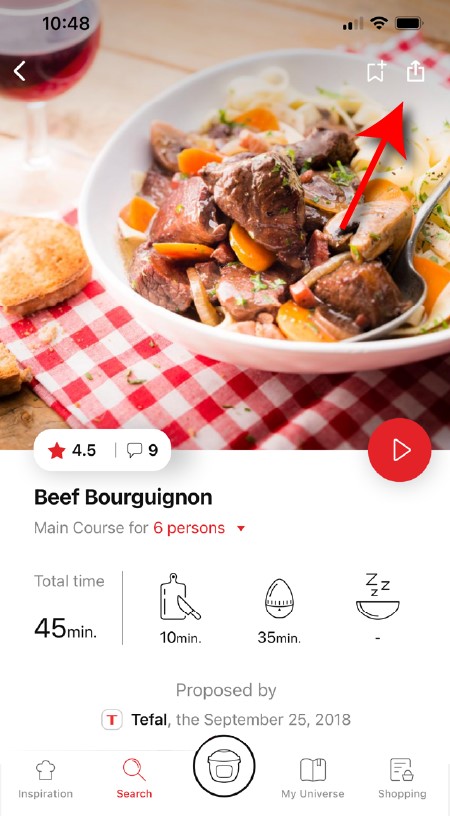
• Go to the recipe you wish to bookmark and select the bookmark logo in the top right corner. • A "My Notebooks" tab appears: select the "My Favorites" location. • The recipe has been added.
You need to create an account and sign in to the application in order to access this feature. Click the sharing logo to view the sharing options. You can then choose how you would like to share this recipe.
The application has rich content and requires a stable Wi-Fi connection to download correctly. If your application does not download correctly, delete it and try to download again when you have a more stable Wi-Fi connection. During initial installation, the download may take several minutes while the application saves all the photos on your Smartphone or tablet.
Your application uses notifications to alert you at the end of cooking times using a beep. If you want to turn off this signal, simply deactivate it in your tablet or Smartphone. You may also disable sounds in the parameter settings for notifications on your telephone or tablet.
Your application uses notifications to alert you when your cooking is finished but also to let you know when new content (information, recipe...) is available. If you wish, you can disable them from your smartphone settings.
Your appliance can be used without the app. However, only the app will enable you to benefit from the many advantages available when your product is connected.
You must create an account and log in to your app to access these features.
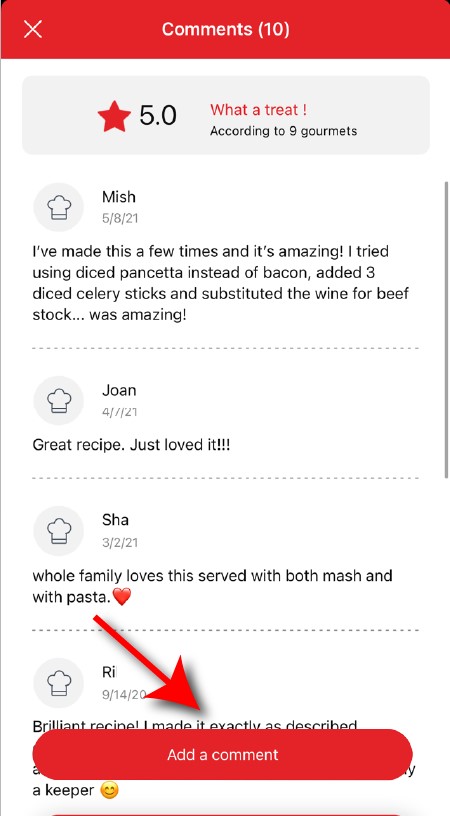
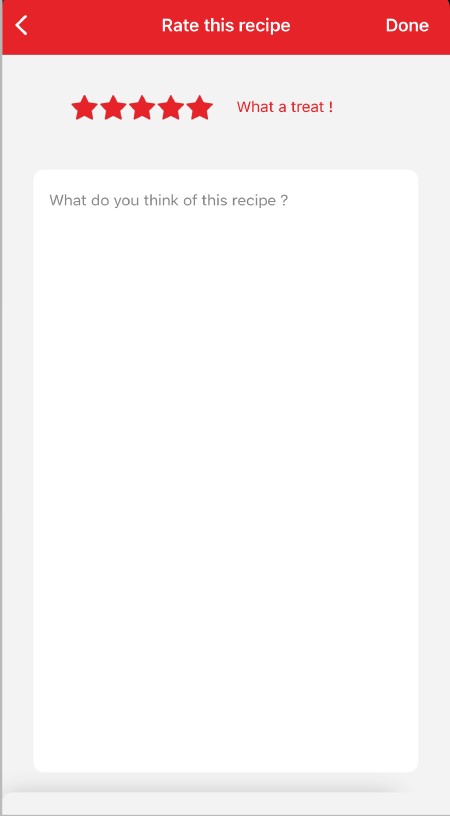
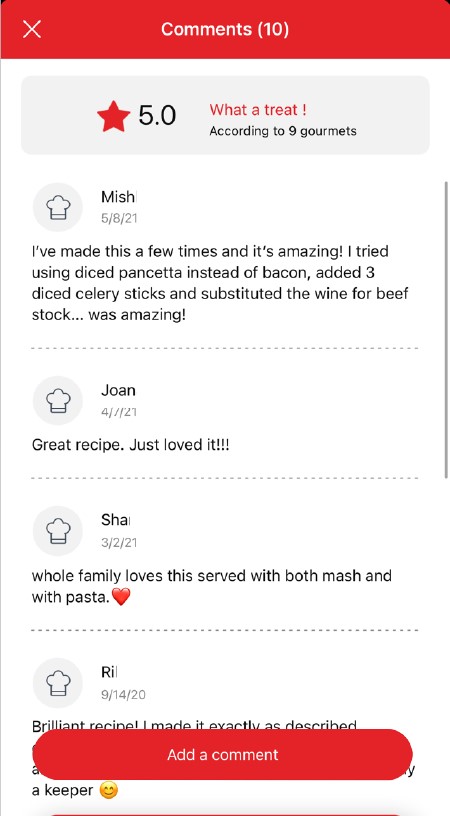
Once logged into your account, you will be able to rate the recipe and add a comment by following the instructions that appear on the screen after clicking on the notes/comments space.
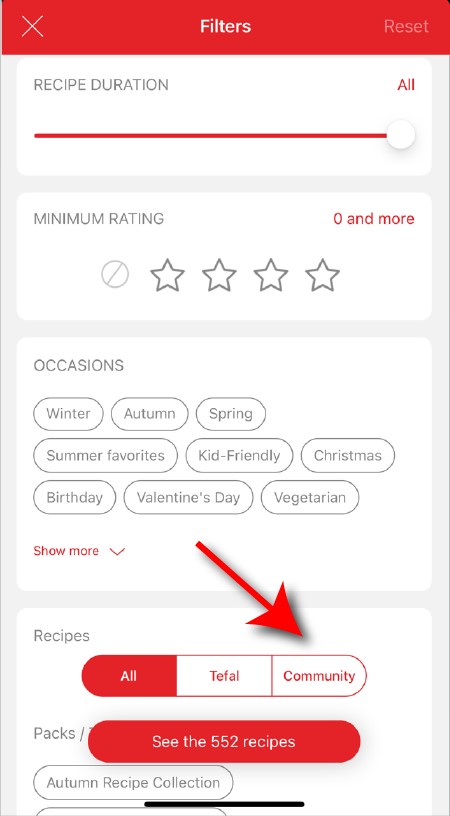
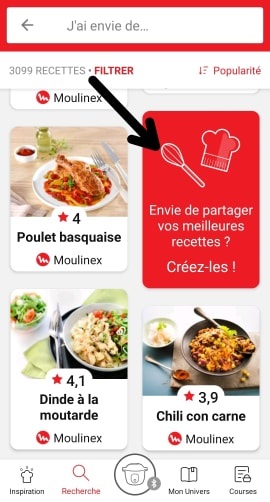
When using the search function, select "Filter recipes". In the "Recipes" section, select "Community" only. You will then be able to see the recipes from the community.
Once you have completed your search, specific filters make it easier for you to find the recipes that meet your needs.
The customizable filter: • Click on "Filter" in order to sort the recipes according to the type of dish (starter, main course, dessert), the time it takes to make the recipe, the minimum rating, their themes (or packs)... • You can also choose to select only the recipes of the brand or the recipes proposed by the community.
Sorting recipes: Once you have made a search, you can sort your recipes by popularity, rating, age or alphabetical order.
You must create an account and log in to your app to access these features.
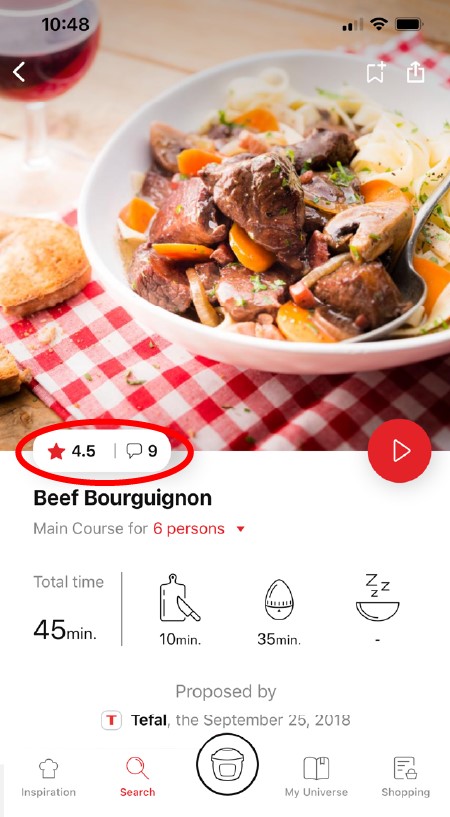
Once logged in, you will be able to read the comments and see the notes that community members have given to the recipe by clicking on the notes/comments area.
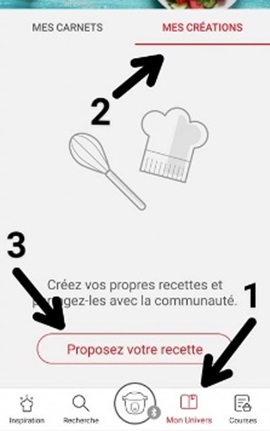
Make sure that no identical recipe already exists on the app, otherwise your new recipe will be rejected by the administrator. We will not validate a recipe from another author that has been copied from a website or blog.
Be careful, it is forbidden to use a photo from the Internet or a book. You must take a photo of your recipe's result in order to be able to deposit and share it. Your recipe will be rejected if the photo is found on the Internet and you are not the original author.
Avoid abbreviations of words as much as possible and avoid using too familiar language, local expressions... To be well understood by everyone, regardless of their location!
You must create an account and log in to your app to access this feature.
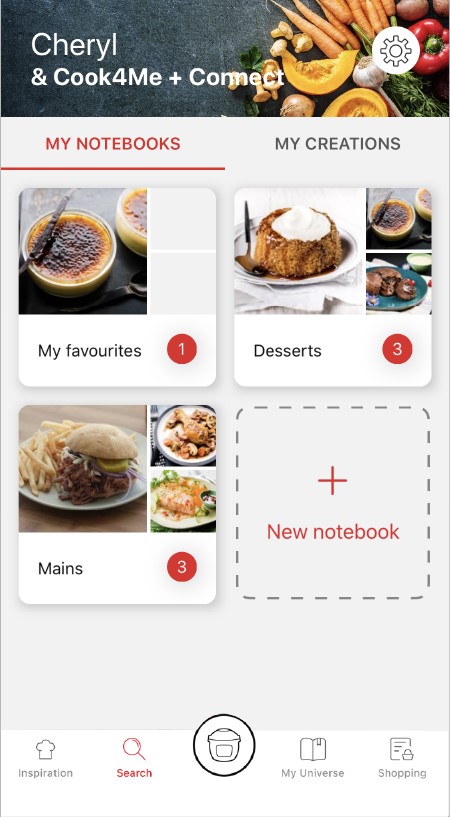
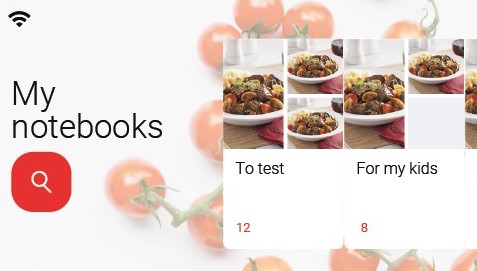
• Choose the "My Universe" tab in the navigation bar. • There, you will find your recipe booklets and can create new ones by clicking on "New booklet".
When you publish the recipe after you have entered it, it is checked before it is visible in the app. A delay of about 48 to 72 hours is therefore necessary before you find it on the app. A confirmation email will be sent to you notifying you of the validation or rejection of your recipe.
Choose the "My Universe" tab in the navigation bar, then select the booklet you wish to modify or delete. Click on the pencil at the top right of the screen, then select the action you are looking for ("Delete booklet", "Rename booklet" or "Delete recipes").
The app is no longer compatible on Android versions 4.4.4 or lower, because of reinforced data security.
As far as possible, we recommend that you update your device to a higher Android version or use another compatible device.
Updates will not only allow you to enjoy a richer experience with new features and compatibility with the latest technology, but will also protect you against possible security vulnerabilities that have been fixed in the latest versions.
It is important to select your product in the app in order to find the right recipes for that product. This way, the app will suggest hundreds of ideal recipes. It will also let you add your accessories and access the associated recipes.
• In "My universe", select "My profile". • Click on the image of the registered product. • Click on "Remove the product". The app will then ask you to select a product.
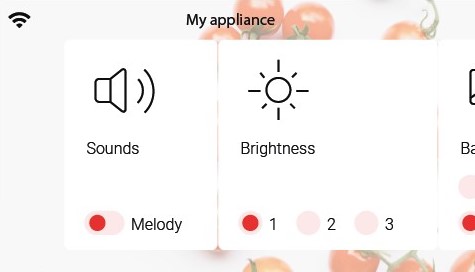
• Start/Stop button: touch the white spot at the bottom of the screen to turn on your device. • Touch screen: scroll the screen with your finger and select your feature. • Back key: once you have selected a feature, a back button will appear at the bottom left to return to the previous screen. It does not appear when you are on the home screen.
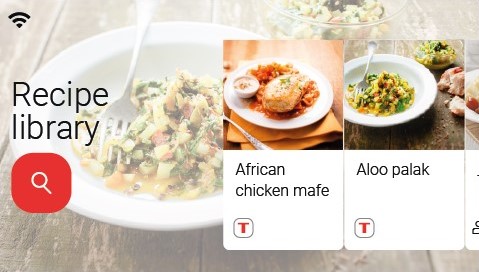
Thanks to the library, find the recipes integrated in your device and filter them according to your criteria. Thanks to the connection with your application, you'll have access to more recipes from the brand and the community! Comment, rate and share your favorite recipes.
• You can access the recipe library from the home screen. • Keep in mind that if you are not connected to the wifi, you will only have access to the list of recipes integrated into your device. • When you are in the library, you can scroll through the recipes or filter your search.
• You can find the recipe booklets that you created with your mobile application from the home screen. • Please note that if you are not connected to your user account, no recipe will appear. • You have to go through the application to add or remove recipes from your booklets.
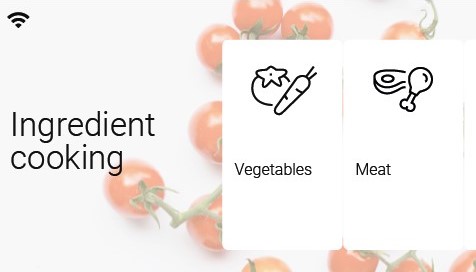
The list of cookings by ingredients offers you cooking times and cooking modes adapted to the quantity you have at your disposal. There are 4 categories of food: Starches, Vegetables, Fishes and Meats. You can access the ingredients cooking list from the home screen.
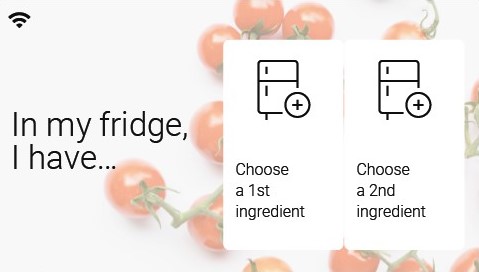
Thanks to the function "In my fridge" you can indicate the ingredients that you have at your disposal and we will suggest suitable recipes.
• You can access this feature from the home screen. • Add one or two ingredients by typing their name in the search bar and selecting it from the suggestions. • You can then enter the weight of the added ingredients so that we can offer you recipes for those quantities.
First connect the cord to the device and then plug it into the power outlet. Make sure that the power cord is properly connected to both the device and the power outlet.
Make sure that the device is installed on a flat, stable, dry and heat-resistant surface. Depending on the model, you can choose your country and language.
This function is not active in all modes or for all preparations. It is deactivated by the device for the preparation of programmed recipes containing fragile ingredients such as milk, fish, meat or eggs (see manual). Only possible with some ingredients such as rice, cereals and vegetables up to 15 hours in advance. These are health requirements to avoid possible undesirable bacterial growth.
Low-pressure cooking allows you to quickly cook your sensitive recipes based on fish, spinach... without damaging them.
What you need to know: • The filling level of the bowl should never exceed the MAX level. • For food that can expand during cooking (rice, seeds, lentils, peas, etc.), do not fill the bowl beyond half its maximum capacity. • The bowl should always be filled with a minimum of 200 ml of liquid. • When the timer reaches 0 and the following screen appears, you will notice a release of steam at the back of the lid.
CAUTION: Do not put your hands near the steam outlet! It is possible that a slight flow of steam may escape from the back of the product during cooking.
Express cooking allows you to cook very quickly your recipes for soups, purees, compotes, meat chunks recipes, pasta or rice dishes...
What you need to know: • The filling level of the bowl should never exceed the MAX level. • For food that can expand during cooking (rice, seeds, lentils, peas, etc.), do not fill the bowl beyond half its maximum capacity. • The bowl should always be filled with a minimum of 250 ml of liquid. • When the timer reaches 0 and the following screen appears, you will notice a release of steam at the back of the lid.
CAUTION: Do not put your hands near the steam outlet! It is possible that a slight flow of steam may escape from the back of the product during cooking.
High-pressure cooking allows you to quickly cook all types of ingredients such as roasts, poultry thighs, legumes, vegetables...
What you need to know: • The filling level of the bowl should never exceed the MAX level. • For food that can expand during cooking (rice, seeds, lentils, peas, etc.), do not fill the bowl beyond half its maximum capacity. • The bowl should always be filled with a minimum of 200 ml of liquid. • When the timer reaches 0 and the following screen appears, you will notice a release of steam at the back of the lid.
CAUTION: Do not put your hands near the steam outlet! It is possible that a slight flow of steam may escape from the back of the product during cooking.
Soft steaming allows you to steam fragile ingredients (in the steam basket) such as fish, spinach... without damaging them.
What you need to know: • The needed amount of water varies according to the recipe and the cooking time. • Always use a minimum of 200 ml of liquid. • Place the steam basket in the bowl and make sure that the food does not touch the lid. • When the timer reaches 0 and the following screen appears, you will notice a release of steam at the back of the lid.
CAUTION: Do not put your hands near the steam outlet! It is possible that a slight flow of steam may escape from the back of the product during cooking.
Strong browning allows you to brown ingredients strongly and gives a golden and crispy appearance to all types of ingredients such as potatoes, meat...
Ingredients should never be filled above the MAX level. The lid must always be open.
You control the cooking time. Leave the ingredients to cook until you are satisfied with the result. Then click 'STOP' to stop cooking.
Boost steaming allows you to steam very quickly all types of ingredients (in the steam basket), especially the most resistant ones such as root vegetables, meats...
What you need to know: • The needed amount of water varies according to the recipe and the cooking time. • Always use a minimum of 250 ml of liquid. • Place the steam basket in the bowl and make sure that the food does not touch the lid. • When the timer reaches 0 and the following screen appears, you will notice a release of steam at the back of the lid.
CAUTION: Do not put your hands near the steam outlet! It is possible that a slight flow of steam may escape from the back of the product during cooking.
• The filling level of the bowl must never exceed the MAX level. • For food that may expand during cooking (rice, seeds, lentils, peas, etc.), do not fill the bowl beyond half its maximum capacity. • The bowl should always be filled with a minimum of 200 ml of liquid. • When the timer reaches 0 and the following screen appears, you will notice a release of steam at the back of the lid during the decompression phase.
! Don't put your hands near the steam exhaust! It is possible that a slight flow of steam may escape from the back of the appliance during cooking.
Once the cooking cycle is completed, the appliance automatically switches to "keep warm" mode. The maximum duration of this mode is 5 hours. After 5 hours, the appliance will go into standby mode.
For some recipes, a delayed start is possible: "Manual menu and ingredients". To avoid the appearance and proliferation of bacteria, it is strongly advised not to use the "delayed start" mode with foods that cannot be kept at room temperature, such as meat, fish, dairy products or eggs.
When choosing delayed start, you must set the current time and the time you want your recipe to be ready. The recipe sequence is then the same as for an immediate start. The delayed start is only available in the "manual cooking" and "ingredient cooking" modes for certain ingredients only.
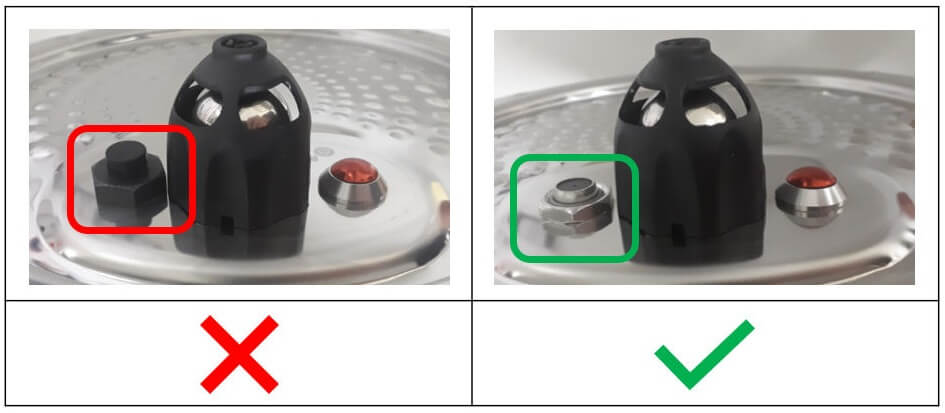
• It may be that part of the lid is not positioned properly. • Apply pressure to the probe in the centre of the central nut to release the lid. • Ensure that the cover of the decompression ball is in the correct locked position.
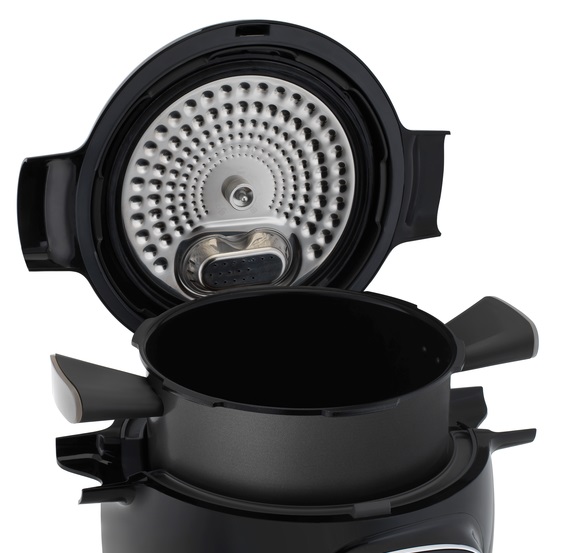
After each use, allow the appliance to cool, then dismantle the cover and its components (valve cover, ball cover and ball) then clean with soapy water.
Before reassembly, move the valve to ensure that it is working correctly, and check that the vent below the ball is not obstructed.
Once you have finished cooking your dish, unplug the appliance for cleaning. Clean the appliance after each use.
You can clean the cooking bowl and steam basket with hot soapy water or in the dishwasher. Clean the body of the appliance with a damp cloth. After several times in the dishwasher, the outside of the cooking bowl may become whitish. You can clean it with the scraper on your sponge.
After each use, remove the condensation collector and clean it thoroughly with clean water or in the dishwasher. Take care to dry it well. Then put it back in its original position.
To clean the metal lid by hand or in the dishwasher, you must remove it and the valve cover: 1) Unscrew the nut in the center of the metal lid. 2) Remove the metal lid. 3) Remove the valve cover.
Before reassembling the ball, check that the duct is not obstructed by blowing into it.
Press on the inner part of the spring loaded safety valve to check that it is not clogged.
Clean the gasket with a damp sponge and rinse thoroughly. Do not use sharp objects. Replace the gasket at least every 3 years. This should be done at an Authorised Service Centre.
Before reassembling the inner lid, clean the upper part of the cooking bowl with a damp cloth. Clean the inside of the metal lid of the appliance with a damp sponge and check the locking rod housing (float valve) to ensure that it is not blocked. Rinse under water and check that the locking rod can move freely.
The locking rod can be disassembled for cleaning by removing the small silicone gasket and turning the metal cover over to remove it.
After following the instructions in the user manual for starting the appliance, make sure that your electrical socket is working by plugging another appliance. If it still does not work, do not try to dismantle or repair the appliance yourself, instead, take it to an approved repair centre
• Check that the opening handle is in the open position before moving the lid to the closed position (green lock). • Check that the nut of the metal lid is quite tight. • Check that the violet ball cap (located on the top of the metal lid) is in the correct locked position (closed lock). • If you are at the end of cooking and you want to close the lid, wait until the hot vapours have dissipated before closing the lid. • Check for foreign bodies between the bowl and the heating plate. Remove the bowl and check that the heating plate, the central element and the underside of the bowl are clean. Also check that the central element can move freely. • The bowl may be deformed (after an impact, fall...). The bowl must be changed at an authorised service centre.
• Check that you are not cooking. • Unplug the product and wait until it cools completely. • Once the product is completely cool (total absence of internal pressure), insert a rod into the hole located between the opening handle and the silent valve.
• This is normal, the odour will disappear completely after a few uses. • Be sure to thoroughly clean the items listed in the instructions: cooking vessel, metal lid, before re-using your appliance.
If the screen remains frozen and the buttons are inactive, please turn off, unplug and reconnect your product. If the problem persists, please take your product to an authorized service centre.
If your product does not get out of standby despite pressing the white spot underneath the screen: • Check that your product is properly plugged in and that the mains plug is powered. • If the product is well powered, remove the plug from the socket for 15 to 20 seconds and then reconnect it. If the problem persists, take your product to an authorized service centre.
Check with the help of the user manual that all parts of the inner metal cover are present, securely in place and clean and that the metal cover is sufficiently screwed on.
Make sure that the locking rod is not mounted upside down. The magnetised part of the locking rod must be on the same side as the ball and the locking rod seal on the opposite side of the ball.
Check that there is sufficient water in the cooking bowl.
Make sure that the condensation collector is properly positioned behind the appliance and that the flow channel is not blocked. Check that the filling is not excessive and that the food does not expand. Some ingredients (such as cream, milk, wine, etc.) are sensitive and may cause overfilling. Be sure to follow the ratio indicated in the instructions.
If an error screen appears on the product please follow the instructions indicated. If necessary, you can refer to your product's manual for more information.
1. Check that the device is not in standby mode by pressing the white center dot (under the touch screen). 2. Make sure that the power cable is connected to the power supply. 3. If the product is powered, unplug the power cord for 10 - 15 seconds and then plug it back in. If the problem persists, contact our customer service or take your device to an approved service centre.
Your product is not connected to the WiFi (via the modem or via a mobile phone). Therefore, you can only access the 250 recipes contained in your product. We advise you to check that WiFi is activated on your modem/phone and to get closer to your modem/phone. We remind you that your product cannot connect to a 5GHz WiFi network, a WiFi network with a password containing special characters, as well as open WiFi networks (which do not require a password).
Your product is connected to the WiFi (via modem, mobile phone,...), but not connected to the database. Therefore, you can only access the 250 recipes contained in your product.
Your product is connected to the WiFi (via modem, mobile phone,...) and to the database. As a result, you can access more than 1,500 recipes.
Browning and Simmering cooking modes are performed with the lid open and raised. Your appliance may incorrectly detect that your lid is not open if you start Browning or Simmering immediately after pressure cooking or steam cooking, and therefore indicate that the lid should be opened. If the lid is already open, then simply acknowledge the message and cooking continues as normal.
• In the settings, select "My device", then "Demo Mode". • Turn off the demo mode. • Enter the code 5555 using the touch keyboard. • Press OK. • Your device will reboot and return to normal mode. The word "Demo" has disappeared and your device is ready for use.
The pot can be washed in the dishwasher as it is safe to be immersed. However, some detergent products contain elements that are more or less aggressive to metals. This grey residue is the reaction of the metal with the product.
We recommend liquid or gel detergents, which are softer.
The coating of the pot is not altered. To restore the original appearance: using a sponge and a mixture of hot water and white vinegar, clean and then rinse the pot thoroughly. Our advice: for greater satisfaction over time of your pot, we recommend manual washing with a mild detergent.
Yes, you can place 4 verrines underneath and 2 verrines on top. They can also be placed in the steam basket. Make sure you always add 25 cl of water. Be careful to place the two upper verrines towards the front in order to prevent them from overturning or hindering the lid from closing.
The grid can be placed in the bowl: • either in low position to raise your food for better air circulation. • either in high position to have 2 cooking levels, one at the bottom of the bowl, and one on the grid.
There are recipes specially written with the 2in1 grid accessory directly in the app. When searching, you can filter based on the accessory. You can also use the grid for manual cooking without any problem.
We advise you to let the grid cool before handling it, or to use potholders to take it from the bowl. If the grid is still hot, place it on a heat-resistant surface.

 The product is not connected.
 The product is connecting.
 The product is connected.
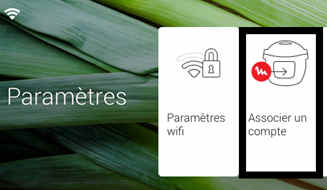


 Cookies are used for audience measurement and personalization to help us improve your use of the product.