TEFAL Tefal OptiGrill Elite GC750D40 Intelligent Health Grill, 12 Automatic Settings, Black/Stainless steel, Smart, 2000W, 4-6 portions

Tefal OptiGrill Elite GC750D40 Intelligent Health Grill, 12 Automatic Settings, Black/Stainless steel, Smart, 2000W, 4-6 portions Our most intelligent health grill is perfect for vegetarians, flexitarians and meat-lovers alike
  • Automatic Sensor Cooking technology: thickness sensor for perfect results every time
  • 12 automatic programs: Cook vegetables, meat and fish to perfection
  • Digital touchscreen: Integrated cooking countdown and easy to use screen
  • Searing boost mode: Add restaurant-worthy marks and lock in juices

Reference: GC750D40

Grilling meat and vegetables has never been so easy

Enjoy perfectly grilled food without all the stress, thanks to OptiGrill Elite – Tefal’s most intelligent health grill. Featuring an Automatic Cooking Sensor which measures the thickness of your food, OptiGrill Elite adapts the cooking time and temperature accordingly to produce perfect results for all tastes. Under and overcooked food is a thing of the past thanks to a cooking level indicator and digital screen displaying an integrated countdown; simply pop in your food and let OptiGrill Elite guide you step-by-step through the cooking cycle from rare to well-done. Not only is this intelligent grill perfect for meat-lovers, its 12 automatic cooking programmes also produce juicy vegetables and succulent fish for vegetarians, flexitarians and pescatarians alike! Choose anything from Red Meat, Burgers, Sausages, Paninis, Fish, Chicken Breasts, Seafood, Bacon, Potatoes, Aubergines, Peppers and Tomatoes – no longer is healthy grilling solely the preserve of meat-eaters! The Searing Boost mode marks your meat to provide restaurant-quality results, whilst the manual mode lets you take control and set the temperature for all your grilled favourites. For added convenience, the frozen food mode defrosts your food before cooking and the Refill feature allows you to immediately start grilling the same food. The die-cast aluminium cooking plates provide incredibly healthy grilled food thanks to their sloped design that allows excess fat to drain away from your food and straight into the removable drip tray. Not only do the cooking plates generously cater for up to four people, they are non-stick, removable and dishwasher-safe to make cleaning up a breeze!

Essentials
  • Perfect Results

    12 automatic programmes and a manual mode ensure perfect results

  • Precise results

    Digital touchscreen with grill indicator that counts down and beeps as food cooks to your liking

  • No guesswork

    12 automatic cooking programs – including four new vegetable options – to simplify grilling

  • Convenient

    Frozen mode to cook straight from the freezer for time-saving and convenience

  • No washing-up

    Removable, dishwasher-safe parts for quick and easy clean-up

  • Professional finish

    Searing boost mode to mark meat and lock in juices for a professional and tasty result

  • Stress-free grilling

    Automatic thickness sensor to measure the food and adjust the grill time for perfect results

Accessories
Specifications
Up to 4 people  
Automatic cooking system details burger, sandwich, fish, seafood, potatoe, pepper, red meat, chicken, sausage, bacon, eggplant, tomato  
Screen with intuitive grilling assistant and a countdown  
   
Power 2000  W
Plates + juice tray  
Power 1830-2180  W
   
Cooking programs 12 automatic programs  
Automatic cooking system    
Manual mode    
   
   
Plates dimensions 30 x 20  cm
Removable plates    
Cooking surface dimensions 30*20  cm
Cooking surface 600cm2  
Removable juice tray    
Dishwasher safe    
Body Stainless steel  
Handle Thermoplastic  
On/Off Switch    
Pilot light    
Adjustable thermostat    
Adjustable thermostat details Adjustable temperature  
Ready to cook light    
Power cord length 0,8  m
Energy Consumption - Off mode (W) 0.2  W
Energy Consumption - Standby mode (W) NA  W
Energy Consumption - Networked standby (W) NA  W
Time to reach off mode (minutes) 10  min
Time to reach standby mode (minutes) NA  min
Time to reach networked standby (minutes) NA  min
Voltage 220-240  V
Frequency 50-60  Hz
Frequent questions
The WiFi icon, especially visible from the home screen, indicates whether your product is connected or not.

WiFi icon crossed outThe product is not connected.
WiFi icon exclamation markThe product is connecting.
WiFi iconThe product is connected.
Your account, to be created from the app, allows you to benefit from additional services related to the interaction of your app with your product:
• Find the recipes saved in your notebooks and favourites directly on the robot's screen.
• Follow remotely the progress of the recipe on your product and receive recipe notifications.
• Display on your product a recipe that you have selected in the application.


From the home page of your device, go to "Settings" and select "Associate an account".
• Download the application on your smartphone from the Google Play store or the App Store.
• From the app, add the product you own and then create an account or sign in.
• An association code is generated. Enter it in your application.
Even if your product doesn't need a very fast WiFi connection to work, the received WiFi signal must still be stable.
If the screen displays a connectivity error, you can move the product closer to your box or add a WiFi repeater (see FAQ 'I don't have WiFi access in my kitchen').
If your product loses the WiFi connection during a recipe, you will be able to finish your recipe without any inconvenience.
However, the videos of that recipe will no longer be accessible until the connection is re-established.
If the WiFi connection is interrupted during an update, this cannot be completed. Your product will be able to reboot to its current version and this update will be rescheduled the next time you start it.
If your smartphone loses internet connection (WiFi or 4G) during a recipe it will have no impact on your product which will be able to execute the recipe without any problem. You will simply no longer be able to follow the progress of the recipe remotely on your smartphone and you will no longer receive notifications about the end of a step or the addition of an ingredient.
Your product can only be associated with one account.
However, any application that is connected to this account can interact with this product.
If you have a tablet and a smartphone, or if other members of your household want to interact with your product, they can simply connect their application using your account.
As soon as an update is available, your product when it connects to the WiFi will suggest you to do the update.


Some updates are priorities for security reasons and you will need to perform them before you can use your product.
Others may be delayed. You can then perform them now or later by going to your product's settings.
If an update fails, you can download it again.
If despite several attempts you are unable to install it, move the product closer to your box, the connection from your kitchen may be too weak to download it.
If the update fails even close to your box, please contact our customer service.
Yes, your device can be used with several smartphones or tablets, even if your product can only be associated with a single account.
So if you own a tablet and a smartphone, or if other members of your household wish to interact with your product, they simply need to connect their application using your account.
If your product is associated with your user account, you will be able to follow the progress of your recipe on your application.
You will also receive end-of-stage or alert notifications.
If you do not receive these notifications, please enable them in your iOS or Android settings.
To remotely send a recipe from your application to your product, simply open a recipe and click on the icon with your product.
If your product is on standby, it will open on your product as soon as it connects to Wifi.
If the product is running, it will be displayed in a few seconds if your product is not already making another recipe.
Place your device on a flat, stable surface.
To obtain an optimal connection between your device and your box, it is recommended to position your device in a place where the Wifi signal received from your box is strong. You can test the connection by positioning your smartphone at the location of your product to see if the WiFi signal received at that location is strong enough.
If the connection is interrupted (connection symbol crossed out), please bring your device and your box closer together to reestablish the connection.
The presence of the fixed connection indicator (application or product) ensures that your devices are connected.
If your product loses the WiFi connection during a recipe, you will be able to finish your recipe without any inconvenience.
• From the home page of your appliance, go to "Settings" and select "Connectivity and Account".
• Download the app on your smartphone from the Google Play store or the App Store.
• From the app, create an account or log in to an existing account then add the product you own.
• Follow the different steps displayed successively on the product and on the app.
• An association code is generated. Enter it in your app.
Your Cookeo connects to WiFi using your phone:
• From the home page of your appliance, go to "Settings", select "Connectivity and Account" then "Activate connection".
• Follow the steps that will suggest you to download the app on your smartphone from the Google Play store or the App store.
• From the app, create an account or log in then add the product you own.
• Follow the different steps displayed successively on the product and on the app.
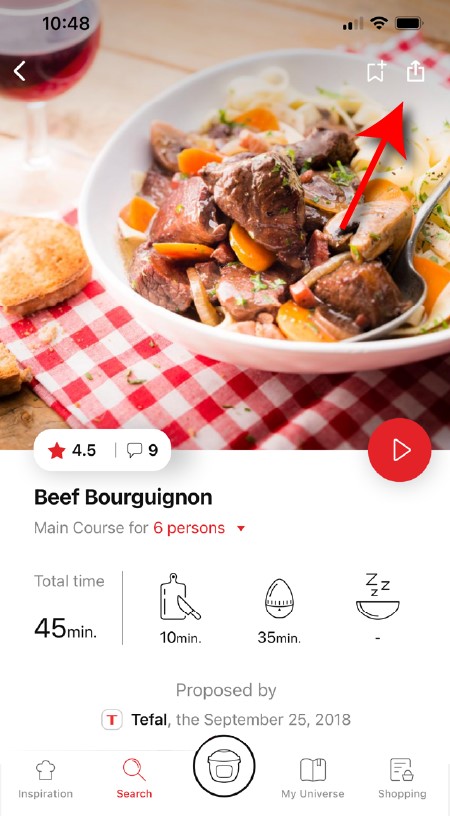
You need to create an account and sign in to the application in order to access this feature.
Click the sharing logo to view the sharing options.
highlighting the sharing functionality in the Companion app
You can then choose how you would like to share this recipe.
• Choose the "Search" tab in the navigation bar.
• Enter a word in the search field.

Tip: recipes are found using key words, so it is easier to enter a type of vegetable (e.g. carrot) rather than just vegetable.
You must create an account and log in to your app to access this feature.

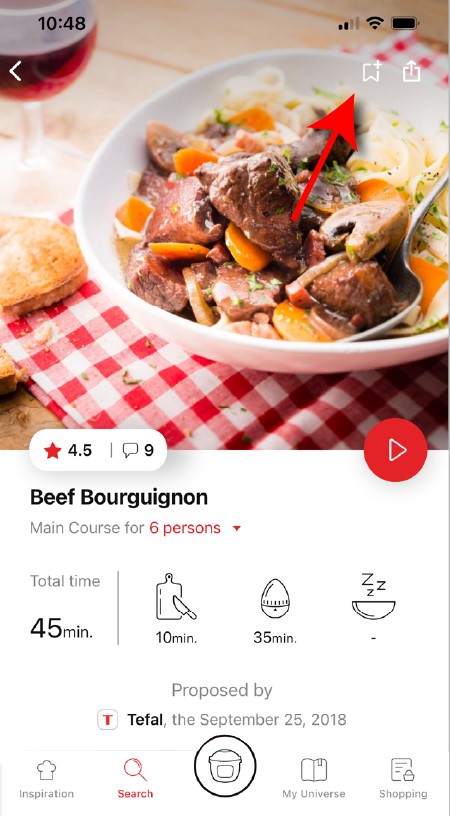
• Go to the recipe you wish to bookmark and select the bookmark logo in the top right corner.
highlighting the bookmark function in the Companion app
• A "My Notebooks" tab appears: select the "My Favorites" location.
• The recipe has been added.
The application has rich content and requires a stable Wi-Fi connection to download correctly.
If your application does not download correctly, delete it and try to download again when you have a more stable Wi-Fi connection.
During initial installation, the download may take several minutes while the application saves all the photos on your Smartphone or tablet.
Your application uses notifications to alert you when your cooking is finished but also to let you know when new content (information, recipe...) is available.
If you wish, you can disable them from your smartphone settings.
You can choose not to accept cookies.
However, the grey cookies banner will remain on your screen as long as you do not click on "accept".
Your application uses notifications to alert you at the end of cooking times using a beep.
If you want to turn off this signal, simply deactivate it in your tablet or Smartphone.
You may also disable sounds in the parameter settings for notifications on your telephone or tablet.
Cookies are used for audience measurement and personalization to help us improve your use of the product.

Audience measurement solutions allow us to analyze traffic, trends, usage and identify malfunctions in order to improve your experience.

Personalization solutions allow us to improve the quality of the information and services we provide and make your experience more enjoyable.

You can accept or deny the use of cookies when you first launch your device.
You must create an account and log in to your app to access these features.

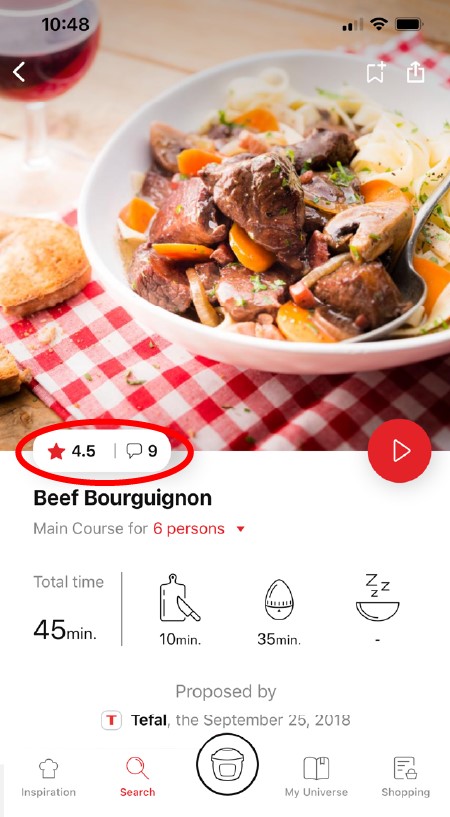
Once logged in, you will be able to read the comments and see the notes that community members have given to the recipe by clicking on the notes/comments area.
highlighting rating & comments feature from recipe page in the Companion appcomments page in the Companion app
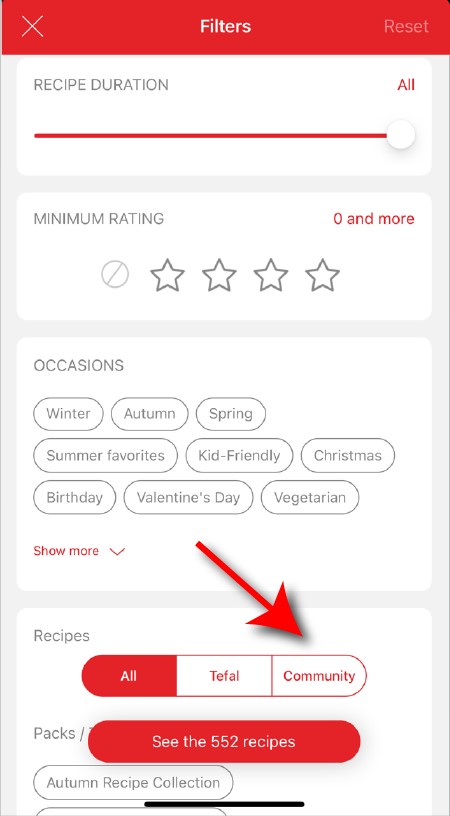
Once you have completed your search, specific filters make it easier for you to find the recipes that meet your needs.

The customizable filter:
• Click on "Filter" in order to sort the recipes according to the type of dish (starter, main course, dessert), the time it takes to make the recipe, the minimum rating, their themes (or packs)...
• You can also choose to select only the recipes of the brand or the recipes proposed by the community.

Sorting recipes:
Once you have made a search, you can sort your recipes by popularity, rating, age or alphabetical order.
When using the search function, select "Filter recipes".
In the "Recipes" section, select "Community" only.
You will then be able to see the recipes from the community.
recipe filters page in the Companion app
You must create an account and log in to your app to access these features.

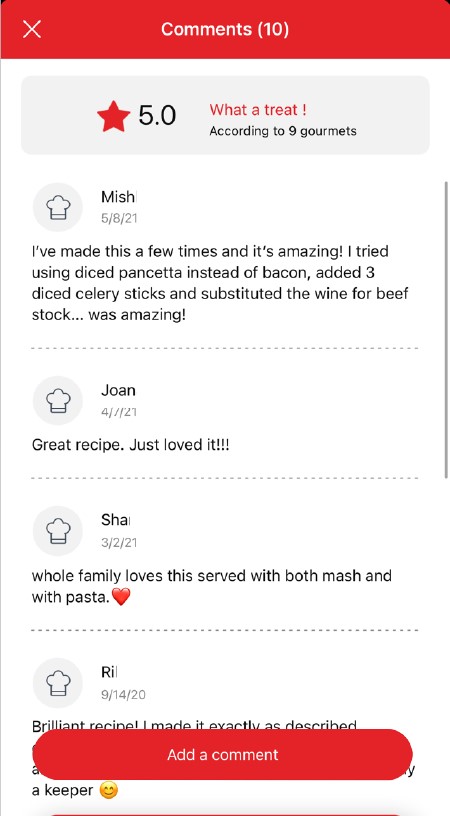
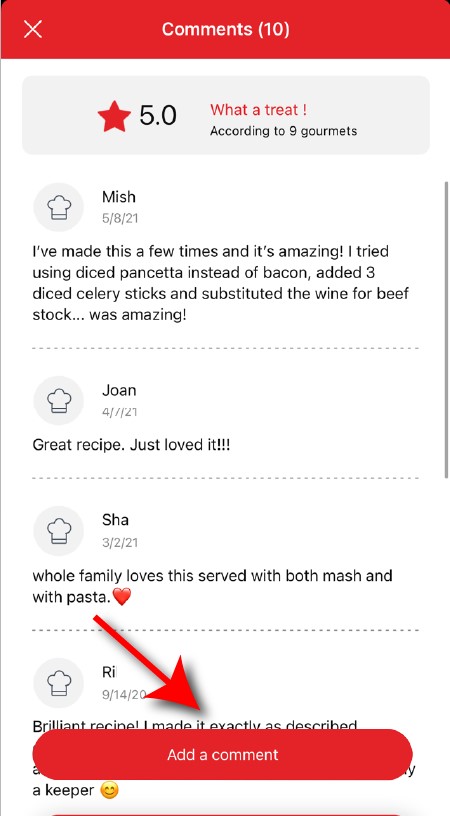
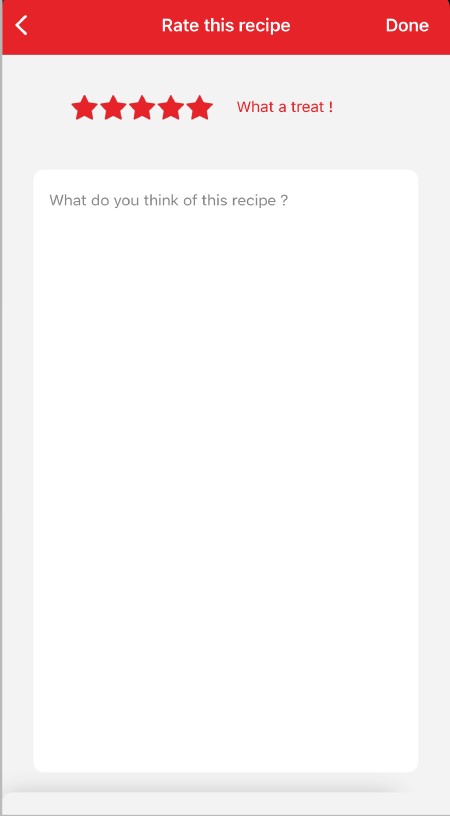
Once logged into your account, you will be able to rate the recipe and add a comment by following the instructions that appear on the screen after clicking on the notes/comments space.
highlighting rating feature from comments page in the Companion apprating page in the Companion app
You must create an account and log in to your app to access this feature.

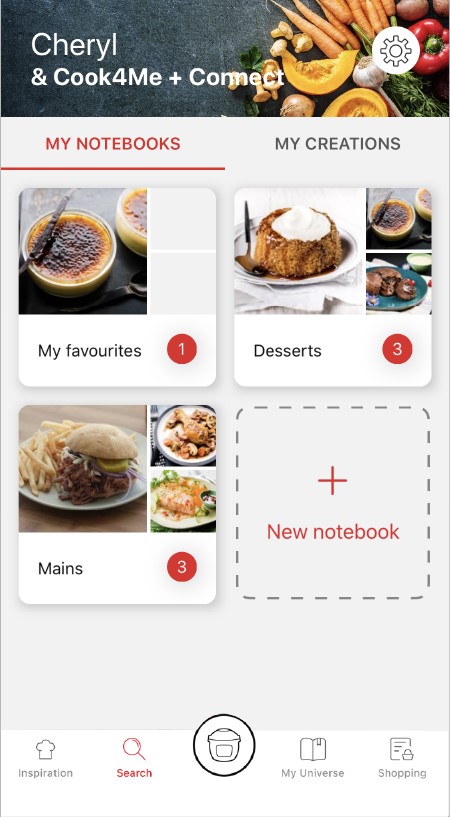
• Choose the "My Universe" tab in the navigation bar.
• There, you will find your recipe booklets and can create new ones by clicking on "New booklet".
recipes booklets page in the Companion app
The app is no longer compatible on Android versions 4.4.4 or lower, because of reinforced data security.

As far as possible, we recommend that you update your device to a higher Android version or use another compatible device.

Updates will not only allow you to enjoy a richer experience with new features and compatibility with the latest technology, but will also protect you against possible security vulnerabilities that have been fixed in the latest versions.
Choose the "My Universe" tab in the navigation bar, then select the booklet you wish to modify or delete. Click on the pencil at the top right of the screen, then select the action you are looking for ("Delete booklet", "Rename booklet" or "Delete recipes").
It is important to select your product in the app in order to find the right recipes for that product. This way, the app will suggest hundreds of ideal recipes.
It will also let you add your accessories and access the associated recipes.
• In "My universe", select "My profile".
• Click on the image of the registered product.
• Click on "Remove the product". The app will then ask you to select a product.


• Start/Stop button: touch the white spot at the bottom of the screen to turn on your device.
• Touch screen: scroll the screen with your finger and select your feature.
• Back key: once you have selected a feature, a back button will appear at the bottom left to return to the previous screen. It does not appear when you are on the home screen.
On the home page, drag the menu to the right and select "Stand by".
Thanks to the function "In my fridge" you can indicate the ingredients that you have at your disposal and we will suggest suitable recipes.


• You can access this feature from the home screen.
• Add one or two ingredients by typing their name in the search bar and selecting it from the suggestions.
• You can then enter the weight of the added ingredients so that we can offer you recipes for those quantities.
To open the lid, press the lid lightly and turn counterclockwise.
Access the home menu using the "Contextual Menu" touch button on the right side of the screen. This button also allows you to return to the home page.

Access the home menu using the "Contextual Menu" touch button on the right side of the screen. This button also allows you to return to put your appliance on standby.

When your appliance is in standby, simply press the dot on the rotary knob to take it out of standby.
Thanks to the library, find the recipes integrated in your appliance. Thanks to the connection with your application, you'll have access to more recipes from the brand and the community!

• You can access the recipe library from the "Inspiration" menu.
• Keep in mind that if you are not connected to the WiFi, you will only have access to the list of recipes integrated into your appliance.
• When you are in the library, you can scroll through the recipes.
• You can find the recipe booklets that you created with the app.
• You can access the recipe library from "My Universe".
• Please note that if you are not connected to your user account, no recipe will appear.
• You have to go through the app to add or remove recipes from your booklets.
The list of cookings by ingredients offers you cooking times and cooking modes adapted to the quantity you have at your disposal.
There are 5 categories of food: Starches, Vegetables, Fishes, Meats and Eggs.
You can access the ingredients cooking list from the home menu under "Cooking ingredients".
• Use only food-grade vacuum bags specific for cooking (not for storage).
• Do not reuse airtight cooking bags.
• Do not use vacuum boxes.
No as the cooking sensors are not active in manual mode.
Express cooking allows you to cook very quickly your recipes for soups, purees, compotes, meat chunks recipes, pasta or rice dishes...

What you need to know:
• The filling level of the bowl should never exceed the MAX level.
• For food that can expand during cooking (rice, seeds, lentils, peas, etc.), do not fill the bowl beyond half its maximum capacity.
• The bowl should always be filled with a minimum of 250 ml of liquid.
• When the timer reaches 0 and the following screen appears, you will notice a release of steam at the back of the lid.

CAUTION: Do not put your hands near the steam outlet!
It is possible that a slight flow of steam may escape from the back of the product during cooking.
Strong browning allows you to brown ingredients strongly and gives a golden and crispy appearance to all types of ingredients such as potatoes, meat...

Ingredients should never be filled above the MAX level. The lid must always be open.

You control the cooking time. Leave the ingredients to cook until you are satisfied with the result. Then click 'STOP' to stop cooking.
Medium browning allows you to brown ingredients and give a golden, crispy appearance to ingredients such as meats, vegetables...

Ingredients should never be filled above the MAX level. The lid must always be open.

You control the cooking time. Leave the ingredients to cook until you are satisfied with the result. Then click 'STOP' to stop cooking.
Soft browning allows ingredients to be gently browned and gives a golden brown appearance to more sensitive ingredients such as fish fillets.

Ingredients should never be filled above the MAX level. The lid must always be open.

You control the cooking time. Leave the ingredients to cook until you are satisfied with the result. Then click 'STOP' to stop cooking.
Soft simmering allows dishes such as meat stews to simmer slowly and gently "over a low heat".

Ingredients should never be filled above the MAX level. The lid must always be open.

You control the cooking time. Leave the ingredients to cook until you are satisfied with the result. Then click 'STOP' to stop cooking.
Medium simmering allows dishes such as meat stews to simmer slowly "over a medium heat".

Ingredients should never be filled above the MAX level. The lid must always be open.

You control the cooking time. Leave the ingredients to cook until you are satisfied with the result. Then click 'STOP' to stop cooking.
Strong simmering allows dishes such as meat stews to simmer "over high heat".

Ingredients should never be filled above the MAX level. The lid must always be open.

You control the cooking time. Leave the ingredients to cook until you are satisfied with the result. Then click 'STOP' to stop cooking.
The "Yogurt" mode is accessible in the "Miscellaneous" manual modes.
The "Sous vide" mode is accessible in the "Miscellaneous" manual modes.
• Low temperature cooking is ideal for long cooking times, up to 12 hours, with the lid closed for a tender and very melting result.
• Classic simmering is used with the lid open to thicken or reduce a sauce at the end of cooking.
• The "Sous vide immersion" mode cooks the vacuum-sealed ingredients and immersed in 3L of water.
• The "Sous vide Eco" mode cooks the ingredients with only 5 cl of water using the steam basket.
• The "Gentle steam" mode is ideal for healthily cooking delicate ingredients such as fish and seafood.
• The "Boost steam" mode is more suitable for meat or vegetables.
Gentle low temperature cooking allows you to simmer dishes such as meat stews "on a low heat", with slow and gentle cooking at 75°C.

Ingredients should never be filled above the MAX level. The lid must always be closed.

You control the cooking time. Leave the ingredients to cook until you are satisfied with the result. Then click 'STOP' to stop cooking.
Strong Low temperature cooking allows dishes such as meat stews to be simmered "over medium heat", with slow cooking at 85°C.

Ingredients should never be filled above the MAX level. The lid must always be closed.

You control the cooking time. Leave the ingredients to cook until you are satisfied with the result. Then click 'STOP' to stop cooking.
Classic simmering allows you to heat from below like in a Dutch oven, to concentrate the flavors.

Ingredients should never be filled above the MAX level. The lid must always be open.

You control the cooking time. Leave the ingredients to cook until you are satisfied with the result. Then click 'STOP' to stop cooking.
Before cleaning your grill, wait around 45 minutes while the device cools. To remove heavy food residue on the grill plates or on the side, we recommend you use a wooden or plastic spatula. To clean the grill and grill components, use a cloth soaked in hot water. Do not immerse the grill in water. Do not use abbrasive cleaning products or products containing alcohol or fuel since these may damage the device.
• Check that the opening handle is in the open position before moving the lid to the closed position (open padlock).
• Check that the nut of the metal lid is quite tight.
• Check that the violet ball cap (located on the top of the metal lid) is in the correct locked position (closed padlock).
• If you are at the end of cooking and you want to close the lid, wait until the hot vapours have dissipated before closing the lid.
• Check for foreign bodies between the bowl and the heating plate. Remove the bowl and check that the heating plate, the central element and the underside of the bowl are clean. Also check that the central element can move freely.
• The bowl may be deformed (after an impact, fall...). The bowl must be changed at an authorised service centre.
1. Check that the lid opening handle is in the open position.
2. Unscrew the nut on the metal lid.

Wait until the device is cold to unscrew the central nut and remove the lid.
Please check the WiFi icon on your product.

WiFi icon crossed out
Your product is not connected to the WiFi (via the modem or via a mobile phone).
Therefore, you can only access the 250 recipes contained in your product.
We advise you to check that WiFi is activated on your modem/phone and to get closer to your modem/phone.
We remind you that your product cannot connect to a 5GHz WiFi network, a WiFi network with a password containing special characters, as well as open WiFi networks (which do not require a password).

WiFi icon exclamation mark
Your product is connected to the WiFi (via modem, mobile phone,...), but not connected to the database.
Therefore, you can only access the 250 recipes contained in your product.

WiFi icon
Your product is connected to the WiFi (via modem, mobile phone,...) and to the database. As a result, you can access more than 1,500 recipes.
• From the home menu, select "Settings".
• In "My appliance", you can choose three brightness levels.
1. Check that the appliance is not in standby mode by pressing the rotary knob.
2. Make sure that the power cable is connected to the power supply.
3. If the product is powered, unplug the power cord for 10 - 15 seconds and then plug it back in.
If the problem persists, contact our customer service or take your appliance to an approved service centre.
To view the images, it is necessary to authorize the downloading of photos via a Wi-Fi connection. This validation takes place at the initial startup of the device.
This setting can be changed in the "Settings" section of the Cookeo.
This may be due to improper cleaning of the cooking plates.
We recommend that you pre-wash your cooking plates in the following manner before putting them in the dishwasher to remove any food residue:
- Soak the plates in hot water and degreasing dish soap for about 30 minutes,
- Scrub both sides of the plate with a sponge or a dish brush, hot water and degreasing dish soap,
- Rinse,
- Put in the dishwasher.
Press the on/off button twice in a row.
or
Press the on/off button once and confirm with OK.

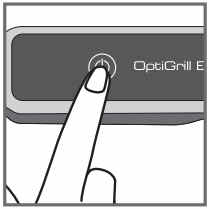
• Step 1: Ensure the Optigrill is plugged into the wall socket and switched on from the mains.

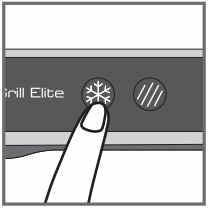
• Step 2: Press the Power button once AND IMMEDIATELY press the Frozen Food button.


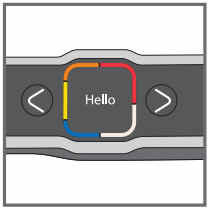
NB: the language can only be changed whilst the display states "Hello". The "Hello" status will only be active for approximately 2 seconds once the machine is switched on.


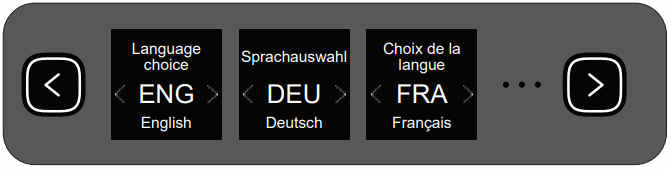
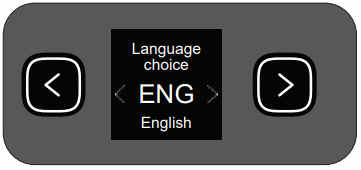
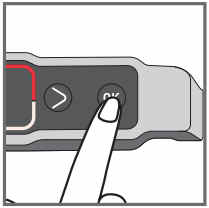
• Step 3: Toggle through the languages by pressing the cursor arrows and once you have selected the correct language, press the OK button.


NB: If you have not followed Step 2 in the allotted time, switch off the machine via the Power button and repeat Step 2 ensuring it is done within the 2 seconds.

The device has been stored or used in a room that is too cold.
Unplug the device and wait a few minutes.
Plug the device in again and press on/off.

If the problem persists, contact Customer Service.
The device has been stored or used in a room that is too cold.
Unplug the device and wait a few minutes.
Plug the device in again and press on/off.

If the problem persists, contact Customer Service.
The device has been stored or used in a room that is too cold.
Unplug the device and wait a few minutes.
Plug the device in again and press on/off.

If the problem persists, contact Customer Service.
The device has been stored or used in a room that is too cold.
Unplug the device and wait a few minutes.
Plug the device in again and press on/off.

If the problem persists, contact Customer Service.
The device has been stored or used in a room that is too cold.
Unplug the device and wait a few minutes.
Plug the device in again and press on/off.

If the problem persists, contact Customer Service.
The device has been stored or used in a room that is too cold.
Unplug the device and wait a few minutes.
Plug the device in again and press on/off.

If the problem persists, contact Customer Service.
The device has been stored or used in a room that is too cold.
Unplug the device and wait a few minutes.
Plug the device in again and press on/off.

If the problem persists, contact Customer Service.
The device has been stored or used in a room that is too cold.
Unplug the device and wait a few minutes.
Plug the device in again and press on/off.

If the problem persists, contact Customer Service.
Unplug the device and contact Customer Service.
Two possibilities:
Press OK if all food has been removed.
or
Do not press OK and leave food to cook a little longer.
The device has remained open for too long during cooking or the device has been idle for too long after the preheating or warming has been completed.
Unplug the device and wait a few minutes. Then plug your device in again and turn it on.
The screen is still on the temperature setting.
Press OK once to go to the time setting and then adjust with the arrows. Press OK to confirm.
Two possibilities:
Press OK to continue cooking in manual mode.
or
Remove food and cut thinner to reduce the thickness, in order to allow cooking in automatic mode.
All non-Touch 6L capacity models have compatible pots.
The Touch model has its own pot which is not compatible with the other models.
No, the 3L pot is specific to 3L capacity models.
The 3L pot cannot replace the 6L pot, nor can it be fitted into it.
The jars, their lids and the holders* can be washed in the dishwasher.

* 8 jars set (ref. XA6140E0)
6 jars set (ref. XA606000):
You can place 4 jars underneath and 2 jars on top.
Be careful to place the two upper jars towards the front to prevent them from tipping over or hindering the lid from closing.

8 jars set (ref. XA6140E0):
You can place the 8 jars with the 2 supports of 4 jars one on top of the other in the bowl.
No, they can only be used with the modes: pressure cooking, reheating.
Yes, they are compatible with its 4 cooking modes without their lids.
The jars can be used in a temperature range between -20°C and 150°C.
Your appliance contains valuable materials which can be recovered or recycled. Leave it at a local civic waste collection point.
Please go to the “Accessories” section of the website to easily find whatever you need for your product.
Find more detailed information in the Guarantee section of this website.
If you believe that one part is missing, please call Consumer Services Center and we will help you find a suitable solution.