User manual and frequently asked questions Vitafruit MJ701134
Delicious fresh fruit juices
With the Vitafruit MJ7011 jam maker, put the fruits in the container, program the cooking time and let them simmer.
Thanks to its stainless container, its plastic blade for automatically blending the ingredients, its central tube for steam evacuation, its 6 cooking programmes and its special program ''Vital'' for a correct sugar quantity, it can be guaranteed that you can successfully prepare jams, jelly and other dishes in this jam maker.
Your account, to be created from the app, allows you to benefit from additional services related to the interaction of your app with your product: • Find the recipes saved in your notebooks and favourites directly on the robot's screen. • Follow remotely the progress of the recipe on your product and receive recipe notifications. • Display on your product a recipe that you have selected in the application.
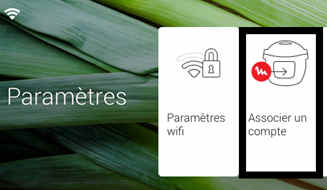
From the home page of your device, go to "Settings" and select "Associate an account". • Download the application on your smartphone from the Google Play store or the App Store. • From the app, add the product you own and then create an account or sign in. • An association code is generated. Enter it in your application.
Even if your product doesn't need a very fast WiFi connection to work, the received WiFi signal must still be stable. If the screen displays a connectivity error, you can move the product closer to your box or add a WiFi repeater (see FAQ 'I don't have WiFi access in my kitchen').
If your product loses the WiFi connection during a recipe, you will be able to finish your recipe without any inconvenience. However, the videos of that recipe will no longer be accessible until the connection is re-established.
If the WiFi connection is interrupted during an update, this cannot be completed. Your product will be able to reboot to its current version and this update will be rescheduled the next time you start it.
If your smartphone loses internet connection (WiFi or 4G) during a recipe it will have no impact on your product which will be able to execute the recipe without any problem. You will simply no longer be able to follow the progress of the recipe remotely on your smartphone and you will no longer receive notifications about the end of a step or the addition of an ingredient.
Your product can only be associated with one account. However, any application that is connected to this account can interact with this product. If you have a tablet and a smartphone, or if other members of your household want to interact with your product, they can simply connect their application using your account.
As soon as an update is available, your product when it connects to the WiFi will suggest you to do the update.
Some updates are priorities for security reasons and you will need to perform them before you can use your product. Others may be delayed. You can then perform them now or later by going to your product's settings.
If an update fails, you can download it again. If despite several attempts you are unable to install it, move the product closer to your box, the connection from your kitchen may be too weak to download it. If the update fails even close to your box, please contact our customer service.
Yes, your device can be used with several smartphones or tablets, even if your product can only be associated with a single account. So if you own a tablet and a smartphone, or if other members of your household wish to interact with your product, they simply need to connect their application using your account.
If your product is associated with your user account, you will be able to follow the progress of your recipe on your application. You will also receive end-of-stage or alert notifications. If you do not receive these notifications, please enable them in your iOS or Android settings.
To remotely send a recipe from your application to your product, simply open a recipe and click on the icon with your product. If your product is on standby, it will open on your product as soon as it connects to Wifi. If the product is running, it will be displayed in a few seconds if your product is not already making another recipe.
Place your device on a flat, stable surface. To obtain an optimal connection between your device and your box, it is recommended to position your device in a place where the Wifi signal received from your box is strong. You can test the connection by positioning your smartphone at the location of your product to see if the WiFi signal received at that location is strong enough. If the connection is interrupted (connection symbol crossed out), please bring your device and your box closer together to reestablish the connection. The presence of the fixed connection indicator (application or product) ensures that your devices are connected.
• From the home page of your appliance, go to "Settings" and select "Connectivity and Account". • Download the app on your smartphone from the Google Play store or the App Store. • From the app, create an account or log in to an existing account then add the product you own. • Follow the different steps displayed successively on the product and on the app. • An association code is generated. Enter it in your app.
Your Cookeo connects to WiFi using your phone: • From the home page of your appliance, go to "Settings", select "Connectivity and Account" then "Activate connection". • Follow the steps that will suggest you to download the app on your smartphone from the Google Play store or the App store. • From the app, create an account or log in then add the product you own. • Follow the different steps displayed successively on the product and on the app.
The most convenient way to use frozen fruit is to thaw the fruit first. You can use any of the thawed liquid from the fruit instead of water in the recipe. Alternatively, use frozen fruit but add an extra 150 ml water. Also increase the cooking time by about 5 to 10 minutes, but check after an additional 5 minutes cooking to see if the preserve is cooked enough. It is normal when preparing frozen fruits for the paddle to stop turning for a while, but the fruit soon thaws and the paddle will turn freely again.
Unrefined sugar is not usually used when making preserves such as jams, jellies or marmalades for two reasons: • It can affect the colour of the final preserve • It may not dissolve as quickly
The minimum quantity of fruit that can be prepared is 500g, otherwise the contents could burn. In the recipe book most recipes use 1 kg of fruit, and can be reduced by half, the cooking time would need to be reduced by about 5 to 10 minutes.
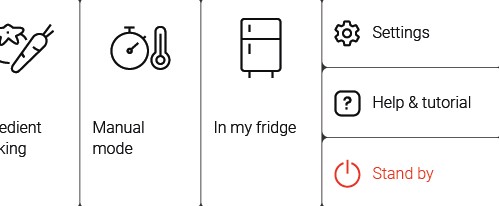
• Start/Stop button: touch the white spot at the bottom of the screen to turn on your device. • Touch screen: scroll the screen with your finger and select your feature. • Back key: once you have selected a feature, a back button will appear at the bottom left to return to the previous screen. It does not appear when you are on the home screen.
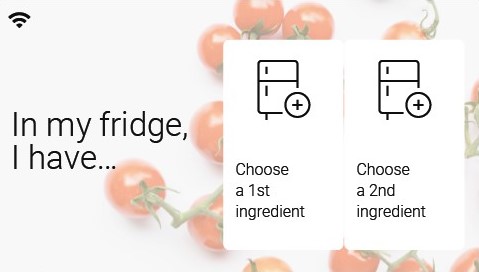
Thanks to the function "In my fridge" you can indicate the ingredients that you have at your disposal and we will suggest suitable recipes.
• You can access this feature from the home screen. • Add one or two ingredients by typing their name in the search bar and selecting it from the suggestions. • You can then enter the weight of the added ingredients so that we can offer you recipes for those quantities.
Access the home menu using the "Contextual Menu" touch button on the right side of the screen. This button also allows you to return to put your appliance on standby.
Thanks to the library, find the recipes integrated in your appliance. Thanks to the connection with your application, you'll have access to more recipes from the brand and the community!
• You can access the recipe library from the "Inspiration" menu. • Keep in mind that if you are not connected to the WiFi, you will only have access to the list of recipes integrated into your appliance. • When you are in the library, you can scroll through the recipes.
• You can find the recipe booklets that you created with the app. • You can access the recipe library from "My Universe". • Please note that if you are not connected to your user account, no recipe will appear. • You have to go through the app to add or remove recipes from your booklets.
The list of cookings by ingredients offers you cooking times and cooking modes adapted to the quantity you have at your disposal. There are 5 categories of food: Starches, Vegetables, Fishes, Meats and Eggs. You can access the ingredients cooking list from the home menu under "Cooking ingredients".
Express cooking allows you to cook very quickly your recipes for soups, purees, compotes, meat chunks recipes, pasta or rice dishes...
What you need to know: • The filling level of the bowl should never exceed the MAX level. • For food that can expand during cooking (rice, seeds, lentils, peas, etc.), do not fill the bowl beyond half its maximum capacity. • The bowl should always be filled with a minimum of 250 ml of liquid. • When the timer reaches 0 and the following screen appears, you will notice a release of steam at the back of the lid.
CAUTION: Do not put your hands near the steam outlet! It is possible that a slight flow of steam may escape from the back of the product during cooking.
Strong browning allows you to brown ingredients strongly and gives a golden and crispy appearance to all types of ingredients such as potatoes, meat...
Ingredients should never be filled above the MAX level. The lid must always be open.
You control the cooking time. Leave the ingredients to cook until you are satisfied with the result. Then click 'STOP' to stop cooking.
• Low temperature cooking is ideal for long cooking times, up to 12 hours, with the lid closed for a tender and very melting result. • Classic simmering is used with the lid open to thicken or reduce a sauce at the end of cooking.
• The "Sous vide immersion" mode cooks the vacuum-sealed ingredients and immersed in 3L of water. • The "Sous vide Eco" mode cooks the ingredients with only 5 cl of water using the steam basket.
• The "Gentle steam" mode is ideal for healthily cooking delicate ingredients such as fish and seafood. • The "Boost steam" mode is more suitable for meat or vegetables.
• Check that the opening handle is in the open position before moving the lid to the closed position (open padlock). • Check that the nut of the metal lid is quite tight. • Check that the violet ball cap (located on the top of the metal lid) is in the correct locked position (closed padlock). • If you are at the end of cooking and you want to close the lid, wait until the hot vapours have dissipated before closing the lid. • Check for foreign bodies between the bowl and the heating plate. Remove the bowl and check that the heating plate, the central element and the underside of the bowl are clean. Also check that the central element can move freely. • The bowl may be deformed (after an impact, fall...). The bowl must be changed at an authorised service centre.
Your product is not connected to the WiFi (via the modem or via a mobile phone). Therefore, you can only access the 250 recipes contained in your product. We advise you to check that WiFi is activated on your modem/phone and to get closer to your modem/phone. We remind you that your product cannot connect to a 5GHz WiFi network, a WiFi network with a password containing special characters, as well as open WiFi networks (which do not require a password).
Your product is connected to the WiFi (via modem, mobile phone,...), but not connected to the database. Therefore, you can only access the 250 recipes contained in your product.
Your product is connected to the WiFi (via modem, mobile phone,...) and to the database. As a result, you can access more than 1,500 recipes.
1. Check that the appliance is not in standby mode by pressing the rotary knob. 2. Make sure that the power cable is connected to the power supply. 3. If the product is powered, unplug the power cord for 10 - 15 seconds and then plug it back in. If the problem persists, contact our customer service or take your appliance to an approved service centre.
To view the images, it is necessary to authorize the downloading of photos via a Wi-Fi connection. This validation takes place at the initial startup of the device. This setting can be changed in the "Settings" section of the Cookeo.
6 jars set (ref. XA606000): You can place 4 jars underneath and 2 jars on top. Be careful to place the two upper jars towards the front to prevent them from tipping over or hindering the lid from closing.
8 jars set (ref. XA6140E0): You can place the 8 jars with the 2 supports of 4 jars one on top of the other in the bowl.
White caster, granulated or jam sugars can be used. Do not use brown sugar (as it will cause the jam to ferment), diet sugar, low calorie sugar or artificial sweeteners.
Scum is normal when making preserves. After testing if the jam is set, skim it off with a strainer. Alternatively, stir in a knob of butter or a few drops of glycerine with a wooden spoon.

 The product is not connected.
 The product is connecting.
 The product is connected.