User manual and frequently asked questions Vitacuisine VS400116

Cook fish or meat, vegetables and dessert all in one go without transferring the flavours
Vita Cuisine VS400116 Steamer : Extra large 10 litre total capacity with convenient external water refill - add water during cooking, fill any time

- Reversible non stick fish plate, to cook food in sauce or natural juices one side, the other side drains juices off
- Vitamin Plus booster button cooks faster and retains up to 50% more vitamins

Reference : VS400116

Frequent questions
The WiFi icon, especially visible from the home screen, indicates whether your product is connected or not.

WiFi icon crossed outThe product is not connected.
WiFi icon exclamation markThe product is connecting.
WiFi iconThe product is connected.
Your account, to be created from the app, allows you to benefit from additional services related to the interaction of your app with your product:
• Find the recipes saved in your notebooks and favourites directly on the robot's screen.
• Follow remotely the progress of the recipe on your product and receive recipe notifications.
• Display on your product a recipe that you have selected in the application.


From the home page of your device, go to "Settings" and select "Associate an account".
• Download the application on your smartphone from the Google Play store or the App Store.
• From the app, add the product you own and then create an account or sign in.
• An association code is generated. Enter it in your application.
Even if your product doesn't need a very fast WiFi connection to work, the received WiFi signal must still be stable.
If the screen displays a connectivity error, you can move the product closer to your box or add a WiFi repeater (see FAQ 'I don't have WiFi access in my kitchen').
If your product loses the WiFi connection during a recipe, you will be able to finish your recipe without any inconvenience.
However, the videos of that recipe will no longer be accessible until the connection is re-established.
If the WiFi connection is interrupted during an update, this cannot be completed. Your product will be able to reboot to its current version and this update will be rescheduled the next time you start it.
If your smartphone loses internet connection (WiFi or 4G) during a recipe it will have no impact on your product which will be able to execute the recipe without any problem. You will simply no longer be able to follow the progress of the recipe remotely on your smartphone and you will no longer receive notifications about the end of a step or the addition of an ingredient.
Your product can only be associated with one account.
However, any application that is connected to this account can interact with this product.
If you have a tablet and a smartphone, or if other members of your household want to interact with your product, they can simply connect their application using your account.
As soon as an update is available, your product when it connects to the WiFi will suggest you to do the update.


Some updates are priorities for security reasons and you will need to perform them before you can use your product.
Others may be delayed. You can then perform them now or later by going to your product's settings.
If an update fails, you can download it again.
If despite several attempts you are unable to install it, move the product closer to your box, the connection from your kitchen may be too weak to download it.
If the update fails even close to your box, please contact our customer service.
Yes, your device can be used with several smartphones or tablets, even if your product can only be associated with a single account.
So if you own a tablet and a smartphone, or if other members of your household wish to interact with your product, they simply need to connect their application using your account.
If your product is associated with your user account, you will be able to follow the progress of your recipe on your application.
You will also receive end-of-stage or alert notifications.
If you do not receive these notifications, please enable them in your iOS or Android settings.
To remotely send a recipe from your application to your product, simply open a recipe and click on the icon with your product.
If your product is on standby, it will open on your product as soon as it connects to Wifi.
If the product is running, it will be displayed in a few seconds if your product is not already making another recipe.
Place your device on a flat, stable surface.
To obtain an optimal connection between your device and your box, it is recommended to position your device in a place where the Wifi signal received from your box is strong. You can test the connection by positioning your smartphone at the location of your product to see if the WiFi signal received at that location is strong enough.
If the connection is interrupted (connection symbol crossed out), please bring your device and your box closer together to reestablish the connection.
The presence of the fixed connection indicator (application or product) ensures that your devices are connected.
If your product loses the WiFi connection during a recipe, you will be able to finish your recipe without any inconvenience.
• From the home page of your appliance, go to "Settings" and select "Connectivity and Account".
• Download the app on your smartphone from the Google Play store or the App Store.
• From the app, create an account or log in to an existing account then add the product you own.
• Follow the different steps displayed successively on the product and on the app.
• An association code is generated. Enter it in your app.
Your Cookeo connects to WiFi using your phone:
• From the home page of your appliance, go to "Settings", select "Connectivity and Account" then "Activate connection".
• Follow the steps that will suggest you to download the app on your smartphone from the Google Play store or the App store.
• From the app, create an account or log in then add the product you own.
• Follow the different steps displayed successively on the product and on the app.
Yes, indeed you can reheat food. Set the timer around 10 minutes (it depends on the food) and make sure that there is enough water in the tank.
Over time, the strong coloured natural juices from foods such as carrots and beetroot may stain the juice collector. This is normal. It may be cleaned with lemon juice straight after cooking.
We recommend that you put the largest pieces of food, requiring the longest cooking time in the lowest basket.
The ingredients are very dense and have a different cooking time: try to prolong the cooking time.
Too many ingredients are cooked together: put the larger sized ingredients and the ingredients with a longer cooking time in the lower bowl.
Try to not overload the steam bowls.
Descale your appliance.
Cut the ingredients into small pieces.
The flavour of food is much better in a steamer and therefore any seasoning should be used sparingly.
If required, you can sprinkle it lightly on the food, or add herbs to the steam water to add flavour to your food.
Yes. You should never leave a small electrical appliance unattended whilst in operation. However, you do not have to watch the steamer all the time. Simply set the timer and the bell will let you know when your food is ready to eat. There are no risks of burning the food and no need to stir it.
Caution: Do not forget to put water in the tank.
All the juices of the steamed food are collected in the juice collector. This can be used as a basic ingredient for stocks and sauces.
If the cooking times are different for the food in each of the bowls, start cooking the food that requires the most time in the lower bowl and then add the upper bowl(s) while cooking is in progress to complete the cooking cycle.
All frozen vegetables can be steamed from frozen.
We only recommend using canned or precooked pulses and beans in the steamer. They should be drained and rinsed and then placed in the steamer basket. They do not need to be soaked or boiled first.
Yes, you can steam them in a steamer. They take the same time as if you were steaming/simmering in a saucepan. Just keep checking the water level and topping it up.
Yes - if your steamer baskets have removal bases, then you will be able to remove the bases from baskets 2 and 3 and place a small whole chicken inside the lower of the steam baskets ready for steam cooking.
Yes, to give meat, chicken and fish a delicious moist flavour you can marinate them a few hours before steaming.
For recipes with a long cooking time you will need to refill the water tank during the cooking period. To refill the water tank, you should use oven gloves to lift the lid and steamer basket. Carefully lift and empty any water that has collected in the juice collector, then refill the water tank using cold untreated tap water.
The cooking time is the same whether you use one or two levels. Please be careful to not pack food too tightly on the first level to ensure that the steam can reach the second level.
You simply place the eggs in the steamer basket. The cooking time is 12 minutes for 6 hard-boiled eggs, 8 minutes for 6 soft-boiled eggs.
Don't handle the bowls and verrines during cooking and don't touch the device when producing steam; always stop it before.
Do not move the appliance when it contains hot liquids or food.
Always use protective gloves to handle the bowls or verrines after cooking.
Try adding fresh herbs, lemon, garlic, oranges or even onion directly to the foods.
To add flavour to chicken, meat and fish made with marinades, use barbecue sauce or spice mixtures.
Yes, especially for recipes with long cooking times.
Also monitor the water level during cooking in case it needs refilling.
Some recipes require the use of cling film for protection, to prevent condensation and protect delicate foods.
Choose a special cling film for cooking, or microwave-safe cling film.
Avoid aluminium foil which tends to increase cooking time.
Put the rice in the rice bowl and fill it with water.
Put the rice bowl in the steam basket or in the largest bowl and start cooking.


• Start/Stop button: touch the white spot at the bottom of the screen to turn on your device.
• Touch screen: scroll the screen with your finger and select your feature.
• Back key: once you have selected a feature, a back button will appear at the bottom left to return to the previous screen. It does not appear when you are on the home screen.
On the home page, drag the menu to the right and select "Stand by".
Thanks to the function "In my fridge" you can indicate the ingredients that you have at your disposal and we will suggest suitable recipes.


• You can access this feature from the home screen.
• Add one or two ingredients by typing their name in the search bar and selecting it from the suggestions.
• You can then enter the weight of the added ingredients so that we can offer you recipes for those quantities.
To open the lid, press the lid lightly and turn counterclockwise.
Access the home menu using the "Contextual Menu" touch button on the right side of the screen. This button also allows you to return to the home page.

Access the home menu using the "Contextual Menu" touch button on the right side of the screen. This button also allows you to return to put your appliance on standby.

When your appliance is in standby, simply press the dot on the rotary knob to take it out of standby.
Thanks to the library, find the recipes integrated in your appliance. Thanks to the connection with your application, you'll have access to more recipes from the brand and the community!

• You can access the recipe library from the "Inspiration" menu.
• Keep in mind that if you are not connected to the WiFi, you will only have access to the list of recipes integrated into your appliance.
• When you are in the library, you can scroll through the recipes.
• You can find the recipe booklets that you created with the app.
• You can access the recipe library from "My Universe".
• Please note that if you are not connected to your user account, no recipe will appear.
• You have to go through the app to add or remove recipes from your booklets.
The list of cookings by ingredients offers you cooking times and cooking modes adapted to the quantity you have at your disposal.
There are 5 categories of food: Starches, Vegetables, Fishes, Meats and Eggs.
You can access the ingredients cooking list from the home menu under "Cooking ingredients".
• Use only food-grade vacuum bags specific for cooking (not for storage).
• Do not reuse airtight cooking bags.
• Do not use vacuum boxes.
Express cooking allows you to cook very quickly your recipes for soups, purees, compotes, meat chunks recipes, pasta or rice dishes...

What you need to know:
• The filling level of the bowl should never exceed the MAX level.
• For food that can expand during cooking (rice, seeds, lentils, peas, etc.), do not fill the bowl beyond half its maximum capacity.
• The bowl should always be filled with a minimum of 250 ml of liquid.
• When the timer reaches 0 and the following screen appears, you will notice a release of steam at the back of the lid.

CAUTION: Do not put your hands near the steam outlet!
It is possible that a slight flow of steam may escape from the back of the product during cooking.
Strong browning allows you to brown ingredients strongly and gives a golden and crispy appearance to all types of ingredients such as potatoes, meat...

Ingredients should never be filled above the MAX level. The lid must always be open.

You control the cooking time. Leave the ingredients to cook until you are satisfied with the result. Then click 'STOP' to stop cooking.
Medium browning allows you to brown ingredients and give a golden, crispy appearance to ingredients such as meats, vegetables...

Ingredients should never be filled above the MAX level. The lid must always be open.

You control the cooking time. Leave the ingredients to cook until you are satisfied with the result. Then click 'STOP' to stop cooking.
Soft browning allows ingredients to be gently browned and gives a golden brown appearance to more sensitive ingredients such as fish fillets.

Ingredients should never be filled above the MAX level. The lid must always be open.

You control the cooking time. Leave the ingredients to cook until you are satisfied with the result. Then click 'STOP' to stop cooking.
Soft simmering allows dishes such as meat stews to simmer slowly and gently "over a low heat".

Ingredients should never be filled above the MAX level. The lid must always be open.

You control the cooking time. Leave the ingredients to cook until you are satisfied with the result. Then click 'STOP' to stop cooking.
Medium simmering allows dishes such as meat stews to simmer slowly "over a medium heat".

Ingredients should never be filled above the MAX level. The lid must always be open.

You control the cooking time. Leave the ingredients to cook until you are satisfied with the result. Then click 'STOP' to stop cooking.
Strong simmering allows dishes such as meat stews to simmer "over high heat".

Ingredients should never be filled above the MAX level. The lid must always be open.

You control the cooking time. Leave the ingredients to cook until you are satisfied with the result. Then click 'STOP' to stop cooking.
The "Yogurt" mode is accessible in the "Miscellaneous" manual modes.
The "Sous vide" mode is accessible in the "Miscellaneous" manual modes.
• Low temperature cooking is ideal for long cooking times, up to 12 hours, with the lid closed for a tender and very melting result.
• Classic simmering is used with the lid open to thicken or reduce a sauce at the end of cooking.
• The "Sous vide immersion" mode cooks the vacuum-sealed ingredients and immersed in 3L of water.
• The "Sous vide Eco" mode cooks the ingredients with only 5 cl of water using the steam basket.
• The "Gentle steam" mode is ideal for healthily cooking delicate ingredients such as fish and seafood.
• The "Boost steam" mode is more suitable for meat or vegetables.
Gentle low temperature cooking allows you to simmer dishes such as meat stews "on a low heat", with slow and gentle cooking at 75°C.

Ingredients should never be filled above the MAX level. The lid must always be closed.

You control the cooking time. Leave the ingredients to cook until you are satisfied with the result. Then click 'STOP' to stop cooking.
Strong Low temperature cooking allows dishes such as meat stews to be simmered "over medium heat", with slow cooking at 85°C.

Ingredients should never be filled above the MAX level. The lid must always be closed.

You control the cooking time. Leave the ingredients to cook until you are satisfied with the result. Then click 'STOP' to stop cooking.
Classic simmering allows you to heat from below like in a Dutch oven, to concentrate the flavors.

Ingredients should never be filled above the MAX level. The lid must always be open.

You control the cooking time. Leave the ingredients to cook until you are satisfied with the result. Then click 'STOP' to stop cooking.
Yes, they are dishwasher safe but it is preferable to wash on the lowest heat setting or prewash setting.
Yes, it must be descaled every 7 to 10 uses. To do this, simply fill the water tank with 1/3 white vinegar and 2/3 water.
Leave to act cold for 1 night.
Rinse the inside of the water tank several times with warm water.
Never use abrasive cleaning products.
On average, we recommend descaling your appliance every 7 to 10 uses to maintain an effective flow of steam and extend the life of your appliance.
To do this, simply fill the water tank with 1/3 white vinegar and 2/3 water.
Leave to act cold for 1 night.
Rinse the inside of the water tank several times with warm water.
Never use abrasive cleaning products.
The appliance has not been descaled after 7 to 10 uses: descale it.
[Check 1] Have you put the water in the right place?
Please put the water in the water tank with the grey part in the middle (the heater).

[Check 2] Did you put enough water in the water tank?
If there is not enough water in the water tank, it won't be able to create steam. Even if just cooking for a short time, you should ensure that the water reaches at least the top of the heater (the grey part). Even if you have put in enough water, it will take some time before it starts steaming.

[Check 3] Is the heater (grey part) dirty?
If there are minerals from the water adhered to the heater, it may not transmit heat correctly and steam may not be created. If there are changes such as discolouration of the heater - brown, black or white - or peeling of the surface, care of the heater will be necessary. Please carry out a descaling.
This is working correctly. The turbo ring surrounds the heater so that the water inside is effectively heated. It is designed so that it doesn't fit flush and the water from the space in between is used to make the steam. Please make sure that the turbo ring is orientated correctly so the notch is facing down.
The surface of the heater isn't peeling. It is probably a film that has attached itself to the surface of the heater. Carry out a descaling.
When there's not enough water in the tank, the device no longer heats.
Fill it again up to the maximum height mark and the device will automatically restart the cooking programme.
Use gloves and be careful not to touch hot surfaces, or foods being cooked, when refilling the tank.
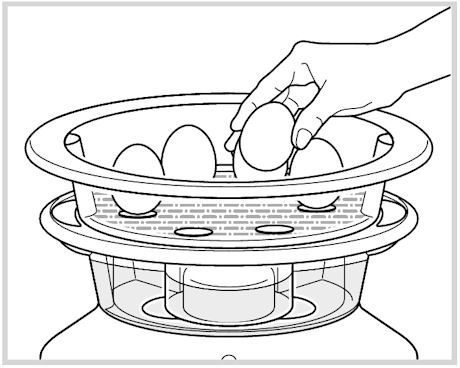
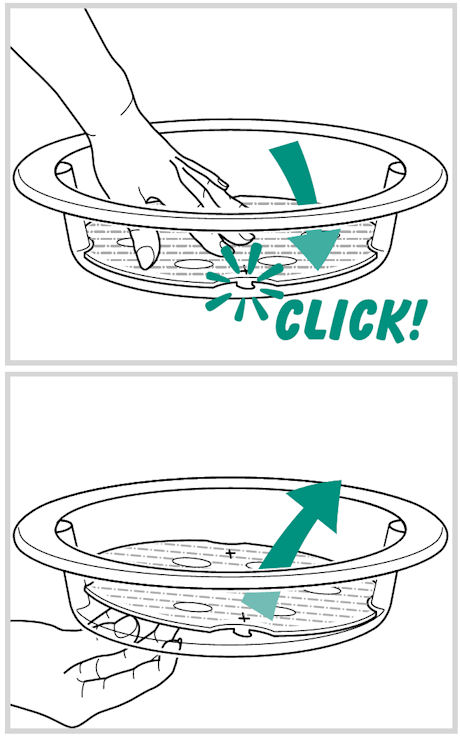
The bowls are equipped with detachable grills, except the drip tray which must always keep its grills.
By removing the grills, you increase the cooking zone to cook bulky foods (whole chickens, artichokes, lobster, cauliflower, broccoli, etc).
To put the grills into position:
• Keep the grill on the correct side (the clip facing down).
• Put the grill into the bowl.
• Press on the clip zone to attach the bowl.
To remove the grills, press on the top of the grill.
• Check that the opening handle is in the open position before moving the lid to the closed position (open padlock).
• Check that the nut of the metal lid is quite tight.
• Check that the violet ball cap (located on the top of the metal lid) is in the correct locked position (closed padlock).
• If you are at the end of cooking and you want to close the lid, wait until the hot vapours have dissipated before closing the lid.
• Check for foreign bodies between the bowl and the heating plate. Remove the bowl and check that the heating plate, the central element and the underside of the bowl are clean. Also check that the central element can move freely.
• The bowl may be deformed (after an impact, fall...). The bowl must be changed at an authorised service centre.
1. Check that the lid opening handle is in the open position.
2. Unscrew the nut on the metal lid.

Wait until the device is cold to unscrew the central nut and remove the lid.
Please check the WiFi icon on your product.

WiFi icon crossed out
Your product is not connected to the WiFi (via the modem or via a mobile phone).
Therefore, you can only access the 250 recipes contained in your product.
We advise you to check that WiFi is activated on your modem/phone and to get closer to your modem/phone.
We remind you that your product cannot connect to a 5GHz WiFi network, a WiFi network with a password containing special characters, as well as open WiFi networks (which do not require a password).

WiFi icon exclamation mark
Your product is connected to the WiFi (via modem, mobile phone,...), but not connected to the database.
Therefore, you can only access the 250 recipes contained in your product.

WiFi icon
Your product is connected to the WiFi (via modem, mobile phone,...) and to the database. As a result, you can access more than 1,500 recipes.
• From the home menu, select "Settings".
• In "My appliance", you can choose three brightness levels.
1. Check that the appliance is not in standby mode by pressing the rotary knob.
2. Make sure that the power cable is connected to the power supply.
3. If the product is powered, unplug the power cord for 10 - 15 seconds and then plug it back in.
If the problem persists, contact our customer service or take your appliance to an approved service centre.
To view the images, it is necessary to authorize the downloading of photos via a Wi-Fi connection. This validation takes place at the initial startup of the device.
This setting can be changed in the "Settings" section of the Cookeo.
All non-Touch 6L capacity models have compatible pots.
The Touch model has its own pot which is not compatible with the other models.
No, the 3L pot is specific to 3L capacity models.
The 3L pot cannot replace the 6L pot, nor can it be fitted into it.
The jars, their lids and the holders* can be washed in the dishwasher.

* 8 jars set (ref. XA6140E0)
6 jars set (ref. XA606000):
You can place 4 jars underneath and 2 jars on top.
Be careful to place the two upper jars towards the front to prevent them from tipping over or hindering the lid from closing.

8 jars set (ref. XA6140E0):
You can place the 8 jars with the 2 supports of 4 jars one on top of the other in the bowl.
No, they can only be used with the modes: pressure cooking, reheating.
Yes, they are compatible with its 4 cooking modes without their lids.
The jars can be used in a temperature range between -20°C and 150°C.
No, you can steam all types of food: meat, fish, eggs, potatoes, desserts rice, couscous etc.
No, the advantage of steam cooking lies in the fact that the flavours of the vegetables are not transmitted to each other, even when they are mixed.
The steam cooker doesn't cook under pressure, it instead uses the ambient pressure.
The steam in the steam cooker is water boiling temperature, approximately 100°C.
Yes, but not too often, because this results in a drop in temperature and a loss of steam which can slow down the cooking.
Your appliance contains valuable materials which can be recovered or recycled. Leave it at a local civic waste collection point.
Please go to the “Accessories” section of the website to easily find whatever you need for your product.
Find more detailed information in the Guarantee section of this website.
If you believe that one part is missing, please call Consumer Services Center and we will help you find a suitable solution.
Accessories