Your account, to be created from the app, allows you to benefit from additional services related to the interaction of your app with your product: • Find the recipes saved in your notebooks and favourites directly on the robot's screen. • Follow remotely the progress of the recipe on your product and receive recipe notifications. • Display on your product a recipe that you have selected in the application.
Even if your product doesn't need a very fast WiFi connection to work, the received WiFi signal must still be stable. If the screen displays a connectivity error, you can move the product closer to your box or add a WiFi repeater (see FAQ 'I don't have WiFi access in my kitchen').
If your product loses the WiFi connection during a recipe, you will be able to finish your recipe without any inconvenience. However, the videos of that recipe will no longer be accessible until the connection is re-established.
If the WiFi connection is interrupted during an update, this cannot be completed. Your product will be able to reboot to its current version and this update will be rescheduled the next time you start it.
If your smartphone loses internet connection (WiFi or 4G) during a recipe it will have no impact on your product which will be able to execute the recipe without any problem. You will simply no longer be able to follow the progress of the recipe remotely on your smartphone and you will no longer receive notifications about the end of a step or the addition of an ingredient.
From the home page of your device, go to "Settings" and select "Associate an account". • Download the application on your smartphone from the Google Play store or the App Store. • From the app, add the product you own and then create an account or sign in. • An association code is generated. Enter it in your application.
Your product can only be associated with one account. However, any application that is connected to this account can interact with this product. If you have a tablet and a smartphone, or if other members of your household want to interact with your product, they can simply connect their application using your account.
As soon as an update is available, your product when it connects to the WiFi will suggest you to do the update.
Some updates are priorities for security reasons and you will need to perform them before you can use your product. Others may be delayed. You can then perform them now or later by going to your product's settings.
If an update fails, you can download it again. If despite several attempts you are unable to install it, move the product closer to your box, the connection from your kitchen may be too weak to download it. If the update fails even close to your box, please contact our customer service.
If your product is associated with your user account, you will be able to follow the progress of your recipe on your application. You will also receive end-of-stage or alert notifications. If you do not receive these notifications, please enable them in your iOS or Android settings.
To remotely send a recipe from your application to your product, simply open a recipe and click on the icon with your product. If your product is on standby, it will open on your product as soon as it connects to Wifi. If the product is running, it will be displayed in a few seconds if your product is not already making another recipe.
Place your device on a flat, stable surface. To obtain an optimal connection between your device and your box, it is recommended to position your device in a place where the Wifi signal received from your box is strong. You can test the connection by positioning your smartphone at the location of your product to see if the WiFi signal received at that location is strong enough. If the connection is interrupted (connection symbol crossed out), please bring your device and your box closer together to reestablish the connection. The presence of the fixed connection indicator (application or product) ensures that your devices are connected.
Yes, your device can be used with several smartphones or tablets, even if your product can only be associated with a single account. So if you own a tablet and a smartphone, or if other members of your household wish to interact with your product, they simply need to connect their application using your account.
• From the home page of your appliance, go to "Settings" and select "Connectivity and Account". • Download the app on your smartphone from the Google Play store or the App Store. • From the app, create an account or log in to an existing account then add the product you own. • Follow the different steps displayed successively on the product and on the app. • An association code is generated. Enter it in your app.
Your Cookeo connects to WiFi using your phone: • From the home page of your appliance, go to "Settings", select "Connectivity and Account" then "Activate connection". • Follow the steps that will suggest you to download the app on your smartphone from the Google Play store or the App store. • From the app, create an account or log in then add the product you own. • Follow the different steps displayed successively on the product and on the app.
In order to offer you a unique experience and ever more personalized services for each of your products, we have merged the different accounts that you can use on the different digital platforms of the group.
• If you already have an account for another device of the brand, and you wish to connect to another application: Use the same e-mail address and password.
• If you already have an account and want to create a second one for another product: You do not need to create an account. You can simply log in using your existing credentials.
• I don't have an account yet but I would like to take advantage of this unique account: You have only one account creation to do on an application. You will then be able to use this account to connect to other platforms.
The voice function allows you to have a more fluid experience in the step-by-step preparation of the recipe. You no longer need to touch your smartphone to take the next step! Touch your screen with your hand to activate listening, the voice recognition will identify the spoken word from a predefined list to help you progress through the step-by-step preparation of the recipe.
You must create an account and log in to your app to access this feature.
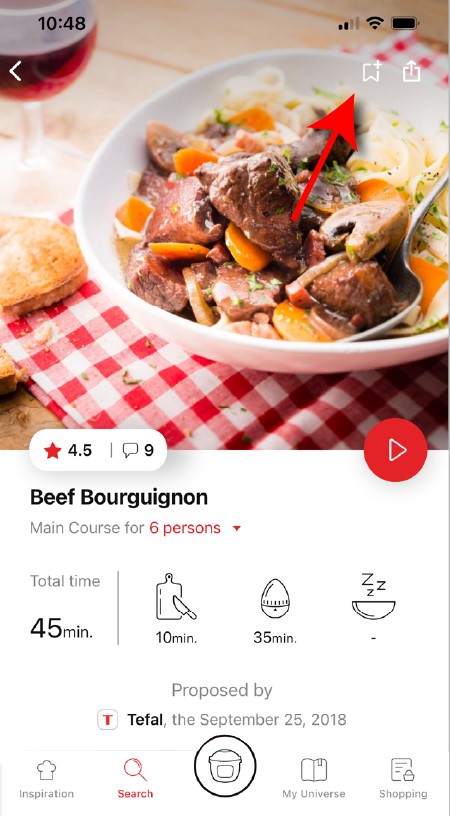
• Go to the recipe you wish to bookmark and select the bookmark logo in the top right corner. • A "My Notebooks" tab appears: select the "My Favorites" location. • The recipe has been added.
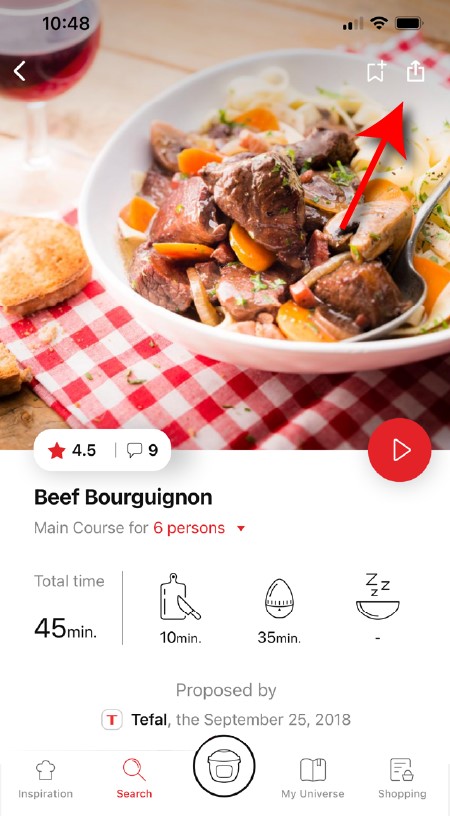
You need to create an account and sign in to the application in order to access this feature. Click the sharing logo to view the sharing options. You can then choose how you would like to share this recipe.
The application has rich content and requires a stable Wi-Fi connection to download correctly. If your application does not download correctly, delete it and try to download again when you have a more stable Wi-Fi connection. During initial installation, the download may take several minutes while the application saves all the photos on your Smartphone or tablet.
Your application uses notifications to alert you at the end of cooking times using a beep. If you want to turn off this signal, simply deactivate it in your tablet or Smartphone. You may also disable sounds in the parameter settings for notifications on your telephone or tablet.
Your application uses notifications to alert you when your cooking is finished but also to let you know when new content (information, recipe...) is available. If you wish, you can disable them from your smartphone settings.
You must create an account and log in to your app to access these features.
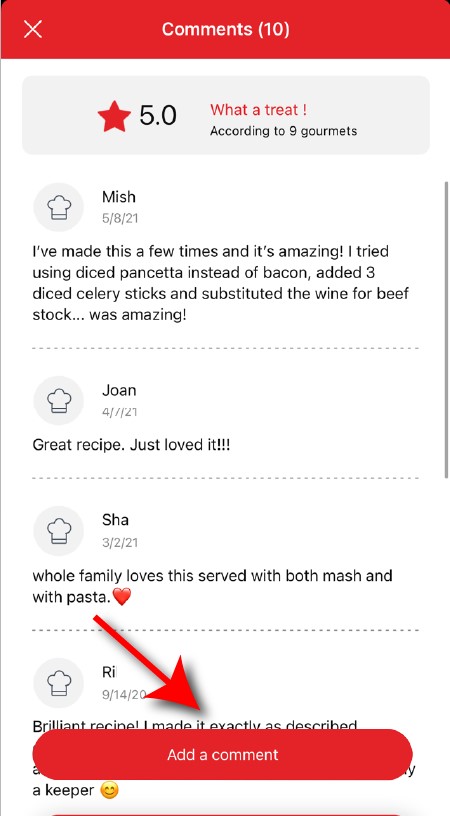
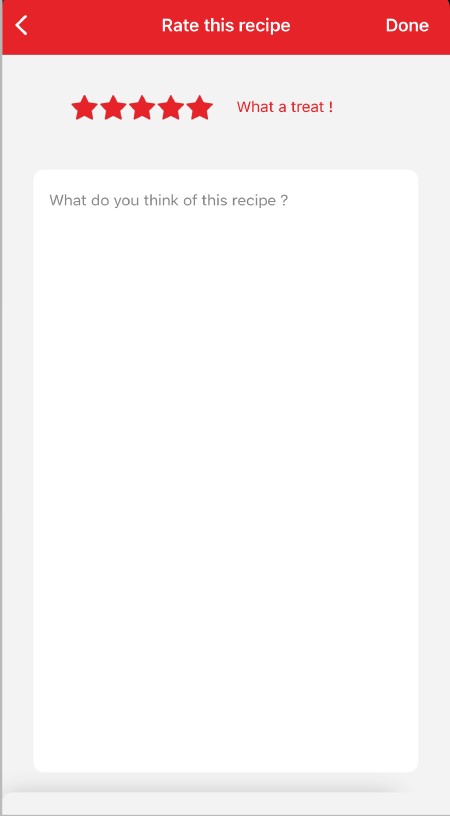
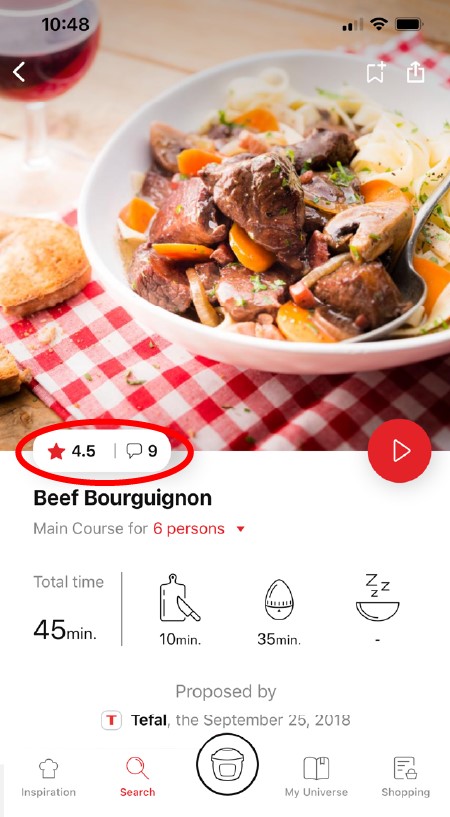
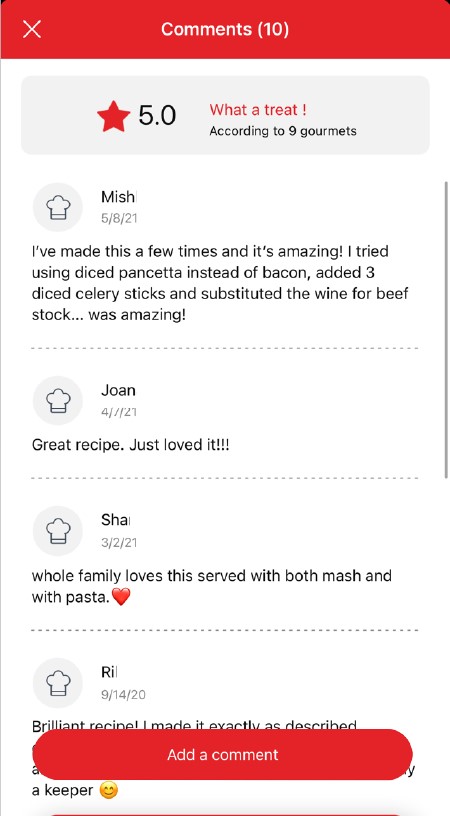
Once logged into your account, you will be able to rate the recipe and add a comment by following the instructions that appear on the screen after clicking on the notes/comments space.
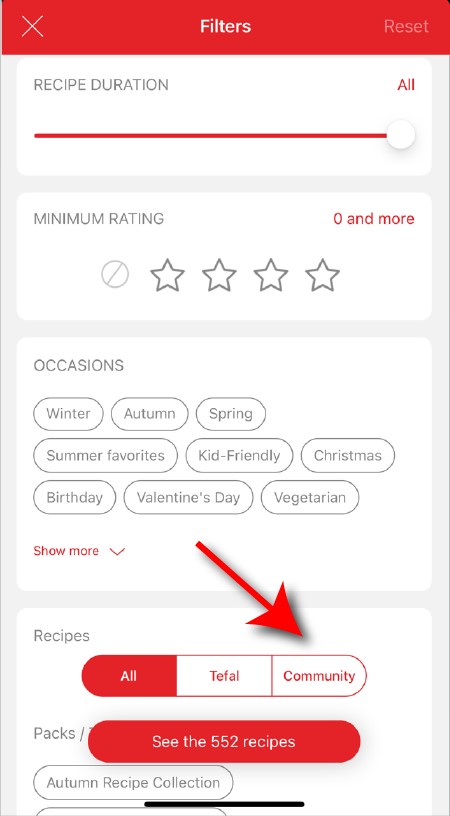
When using the search function, select "Filter recipes". In the "Recipes" section, select "Community" only. You will then be able to see the recipes from the community.
Once you have completed your search, specific filters make it easier for you to find the recipes that meet your needs.
The customizable filter: • Click on "Filter" in order to sort the recipes according to the type of dish (starter, main course, dessert), the time it takes to make the recipe, the minimum rating, their themes (or packs)... • You can also choose to select only the recipes of the brand or the recipes proposed by the community.
Sorting recipes: Once you have made a search, you can sort your recipes by popularity, rating, age or alphabetical order.
You must create an account and log in to your app to access these features.
Once logged in, you will be able to read the comments and see the notes that community members have given to the recipe by clicking on the notes/comments area.
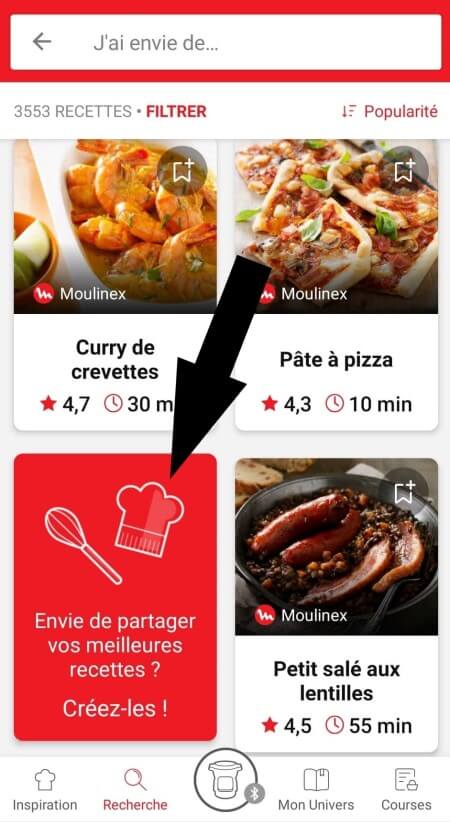
Make sure that no identical recipe already exists on the app, otherwise your new recipe will be rejected by the administrator. We will not validate a recipe from another author that has been copied from a website or blog.
Be careful, it is forbidden to use a photo from the Internet or a book. You must take a photo of your recipe's result in order to be able to deposit and share it. Your recipe will be rejected if the photo is found on the Internet and you are not the original author.
Avoid abbreviations of words as much as possible and avoid using too familiar language, local expressions... To be well understood by everyone, regardless of their location!
You must create an account and log in to your app to access this feature.
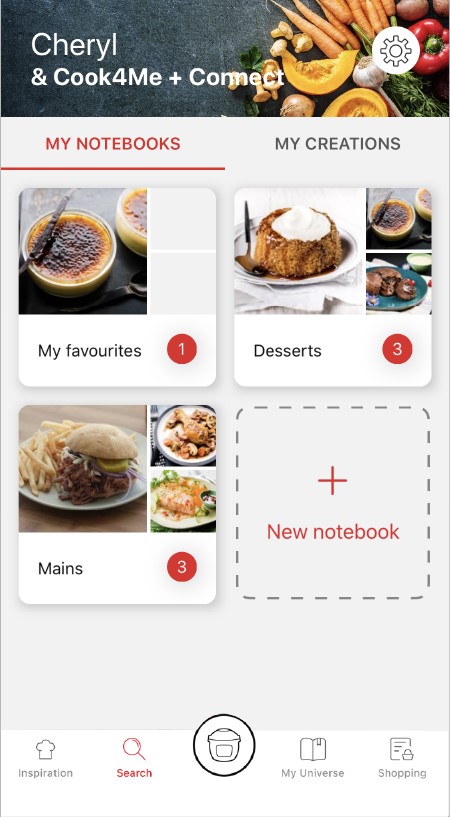
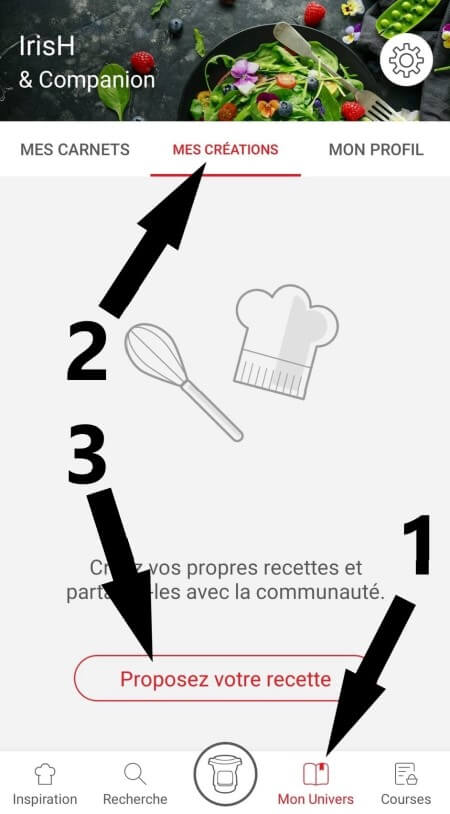
• Choose the "My Universe" tab in the navigation bar. • There, you will find your recipe booklets and can create new ones by clicking on "New booklet".
When you publish the recipe after you have entered it, it is checked before it is visible in the app. A delay of about 48 to 72 hours is therefore necessary before you find it on the app. A confirmation email will be sent to you notifying you of the validation or rejection of your recipe.
Choose the "My Universe" tab in the navigation bar, then select the booklet you wish to modify or delete. Click on the pencil at the top right of the screen, then select the action you are looking for ("Delete booklet", "Rename booklet" or "Delete recipes").
The app is no longer compatible on Android versions 4.4.4 or lower, because of reinforced data security.
As far as possible, we recommend that you update your device to a higher Android version or use another compatible device.
Updates will not only allow you to enjoy a richer experience with new features and compatibility with the latest technology, but will also protect you against possible security vulnerabilities that have been fixed in the latest versions.
It is important to select your product in the app in order to find the right recipes for that product. This way, the app will suggest hundreds of ideal recipes. It will also let you add your accessories and access the associated recipes.
• In "My universe", select "My profile". • Click on the image of the registered product. • Click on "Remove the product". The app will then ask you to select a product.
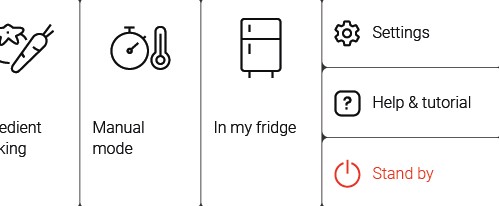
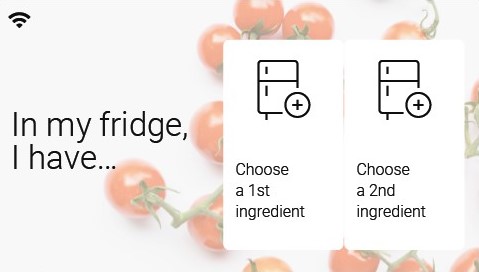
Thanks to the function "In my fridge" you can indicate the ingredients that you have at your disposal and we will suggest suitable recipes.
• You can access this feature from the home screen. • Add one or two ingredients by typing their name in the search bar and selecting it from the suggestions. • You can then enter the weight of the added ingredients so that we can offer you recipes for those quantities.
• Start/Stop button: touch the white spot at the bottom of the screen to turn on your device. • Touch screen: scroll the screen with your finger and select your feature. • Back key: once you have selected a feature, a back button will appear at the bottom left to return to the previous screen. It does not appear when you are on the home screen.
Access the home menu using the "Contextual Menu" touch button on the right side of the screen. This button also allows you to return to put your appliance on standby.
Thanks to the library, find the recipes integrated in your appliance. Thanks to the connection with your application, you'll have access to more recipes from the brand and the community!
• You can access the recipe library from the "Inspiration" menu. • Keep in mind that if you are not connected to the WiFi, you will only have access to the list of recipes integrated into your appliance. • When you are in the library, you can scroll through the recipes.
• You can find the recipe booklets that you created with the app. • You can access the recipe library from "My Universe". • Please note that if you are not connected to your user account, no recipe will appear. • You have to go through the app to add or remove recipes from your booklets.
The list of cookings by ingredients offers you cooking times and cooking modes adapted to the quantity you have at your disposal. There are 5 categories of food: Starches, Vegetables, Fishes, Meats and Eggs. You can access the ingredients cooking list from the home menu under "Cooking ingredients".
You can use the steamer basket to cook the food you want to keep in pieces. Place the ultrablade knife in the bowl, add the ingredients you want to blend according to the recipe (carrots, potatoes, onion, ...) but make sure the vegetables at the bottom of the bowl do not obstruct fitting the steamer basket. Add the ingredients you wish to keep in pieces (bacon, chorizo, peas...) in the steamer basket. Add liquid to the bowl (water, stock,...) but without exceeding the maximum level.
You can use a baking paper which covers the bottom and the inner walls of the basket, to make recipes such as omelets, frittata, fish, white meats... with the steam program.
The sharp blade is ideal for chopping vegetables, herbs, meat, fish, etc., and for mixing soups or compotes. The serrated blade is ideal for kneading heavy or yeast dough and crushing nuts or ice cubes.
The "low steam" setting allows a maximum amount of condensation to be released and it is therefore recommended to prepare dishes and sauces with a better consistency (risotto, creamy puddings, sauces, etc.).
The "high steam" setting allows a maximum amount of heat and steam to build up in the bowl for all types of steam cooking (soups, etc.). This setting also prevents splashing during mixing.
When the vapour plug is locked onto the lid, the pictogram in front of you represents the currently selected setting.
Avoid using the spatula to scrape off dough stuck to the blade. Use a wooden spoon instead; the spatula should be used to empty the bowl after removing the blade.
You can also use the manual mode by setting the temperature to 120°C (248°F) and the cooking time according to the quantity and type of ingredients used. Reduce the size of the pieces.
Please refer to the table (§ First Use) in the user manual. If in doubt about which blade to use, use the one for kneading/crushing. Never use the whisk with heavy dough (bread dough, etc.).
You can increase the quantities, as long as you stick to the maximum quantities specified in the user manual (see table in the “First Use” section). Be careful with automatic programs, especially the “Soup” programs: if you exceed the maximum level of 2,5L (85 oz), you risk having hot soup spatter or overflow.
No, there is a risk of splashing or overflows. NB: Do not try to make jam or milk-based preparations, the temperature between 135 and 150°C is much too high.
The heating system controls an electric filament heating resistor (it is not an induction heating system). Our appliance complies with French/European standards in terms of radio frequency emission, including limiting human exposure to electromagnetic fields. Your appliance is equipped with a grounding system, always connect your appliance to a grounded outlet. Always keep in mind the precautions to take for pacemaker wearers.
• Before using for the first time, wash all items in warm soapy water (but not the motor unit). Your bowl is fitted with a detachable spindle to facilitate cleaning. • Ensure that all packaging has been removed before use, particularly the protection located between the bowl and the motor unit. • Place the seal on the seal holder, then clip the assembly to the lid. • Position the seal on the common spindle. Lock the assembly onto the base of the bowl with the locking ring. • Position the chosen accessory in the bowl: - the accessories on the common spindle at the bottom of the bowl, - the steam basket inside the bowl, having taken care beforehand to fill the 0.7l tank with liquid preparation (water, sauce…). • Incorporate the ingredients into the bowl or steam basket. • Position the lid on the bowl lining up the two triangles, lock the lid without pressing by turning it anti clockwise. • Position the steam regulator cap on the lid; two positions are possible: high steam or low steam (the chosen position must be facing you). • Position the bowl on the motor unit until you hear a “click”. • Your appliance is fitted with a 0/1 switch, set the switch to 1. The appliance only starts up if the bowl and the lid are correctly positioned and locked on the motor unit.
You can use a baking paper and cover the bottom and the inner walls of the basket to make recipes such as omelettes but also frittata, fish, white meat... Use the "Steam cooking" program to cook this type of preparation.
We know that the respect of a certain global temperature is important in the realization of this type of recipe. For best results, we recommend using warm water and taking out your fresh ingredients in advance so that they are not too cold (butter, eggs, milk...).
Whether in automatic program or manual mode, you can stop the device at any time by pressing the "Stop" button. The programme is then in pause mode. You can restart it by pressing "Start" again. If you have made a mistake in programming and/or want to cancel, press and hold the "Stop" button for 2 seconds.
Whether in automatic program or manual mode, you can stop the device at any time by pressing the "Stop" button. The programme is then in pause mode. You can restart it by pressing "Start" again. If you have made a mistake in programming and/or want to cancel, press and hold the "Stop" button for 2 seconds.
Press the programme of your choice, a triangle appears on the screen in the selected programme. In the case of the soups, stews and pastry programmes, successive pressing takes you to the different sub-programmes. The pre-programmed settings can be modified for the time of a recipe (depending on the chosen recipe, ingredients and quantities prepared). Press the speed selector or the cooking temperature selector or the time selector, the setting chosen will flash on the screen. Adjust the setting(s) using the "+/-" selector. When you have finished modifying all your settings, press the “start” button. When the programme has ended, the appliance emits 3 beeps.
Press directly on the selector representing the parameter you have chosen to adjust, i.e. the speed selector or the cooking temperature selector or the time selector, the chosen parameter flashes on the screen. Then adjust the setting(s) using the "+/-" selector. For safety reasons, it is not possible to set a temperature without setting a cooking time. When you have finished entering all your parameters, press the “start” button. When the programme has ended, the appliance emits 3 beeps.
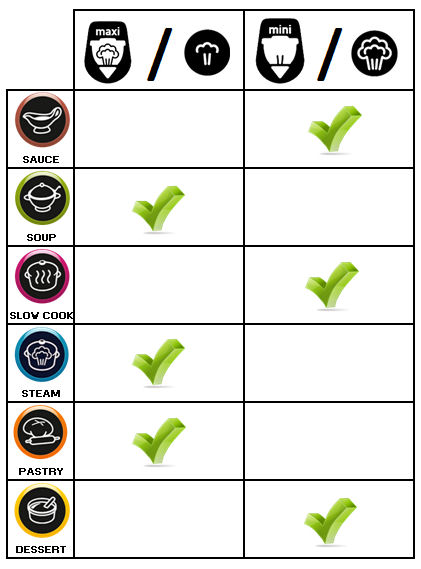
• Automatic programme mode: Speed, cooking temperature and duration are pre-programmed. There are 6 automatic programmes available: Sauces, Soups, Stews, Steam cooking, Pastry, Desserts.
• Manual mode: Customised adjustments of speed parameters, cooking temperature and duration for use at your convenience.
• Connected mode (for connected devices): Thanks to its connected mode, launch a recipe on the app and let your robot take care of the rest. The cooking parameters (time, speed, temperature) are automatically transmitted to your robot. You can have a free mind, it cooks for you! No further adjustments are required, just press "Start". Follow the recipe via your app. It will guide you throughout the recipe and give you clear step-by-step instructions.
The Companion XL allows you to make recipes for up to 10 people thanks to its useful capacity of 3l. The Companion XL's temperature range is extended from 30/130°C to 30/150°C.
Express cooking allows you to cook very quickly your recipes for soups, purees, compotes, meat chunks recipes, pasta or rice dishes...
What you need to know: • The filling level of the bowl should never exceed the MAX level. • For food that can expand during cooking (rice, seeds, lentils, peas, etc.), do not fill the bowl beyond half its maximum capacity. • The bowl should always be filled with a minimum of 250 ml of liquid. • When the timer reaches 0 and the following screen appears, you will notice a release of steam at the back of the lid.
CAUTION: Do not put your hands near the steam outlet! It is possible that a slight flow of steam may escape from the back of the product during cooking.
Strong browning allows you to brown ingredients strongly and gives a golden and crispy appearance to all types of ingredients such as potatoes, meat...
Ingredients should never be filled above the MAX level. The lid must always be open.
You control the cooking time. Leave the ingredients to cook until you are satisfied with the result. Then click 'STOP' to stop cooking.
• Low temperature cooking is ideal for long cooking times, up to 12 hours, with the lid closed for a tender and very melting result. • Classic simmering is used with the lid open to thicken or reduce a sauce at the end of cooking.
• The "Sous vide immersion" mode cooks the vacuum-sealed ingredients and immersed in 3L of water. • The "Sous vide Eco" mode cooks the ingredients with only 5 cl of water using the steam basket.
• The "Gentle steam" mode is ideal for healthily cooking delicate ingredients such as fish and seafood. • The "Boost steam" mode is more suitable for meat or vegetables.
In order to reduce discolouration, rub the stained areas with a cloth or a paper towel dipped in cooking oil, then clean as usual. It is essential to clean immediately after use to avoid any staining.
To remove white traces or "rainbow" coloration from the bottom of the bowl, follow these 3 steps: • Pour 10 cl of white vinegar into the bowl with the spindle and leave it for 1 hour. • Empty the bowl and wipe the inside with a sponge. • Rinse the bowl several times with clean water.
The bowl, the accessories, the steamer basket and all the parts of the lid can be put in the dishwasher. It is not recommended to put the spindle as well as the bowl seal into the dishwasher.
It is advisable to clean the tools immediately after staining appears, you can use lemon juice. You can also leave the accessory in sunlight for a few hours.
To make cleaning easier: • After emptying the basin, position the whisk in the bowl. • Pour in 0,7L of water (24 oz) and a few drops of dishwashing liquid. • Close the lid with the steam regulator stopper. • Program the appliance as follows: Speed 7 / 100°C (212°F) / 3 mins then press "Start".
When the appliance switches to keep-warm mode (beep sound), turn it off and finish cleaning in the sink.
1. Let it soak for 1 hour (water + dishwashing liquid). 2. Scrape off the deposit using a wooden spatula or spoon. 3. After emptying the bowl, scrub the bottom using the abrasive side of a sponge. 4. If there are still traces of the stain, scour with steel wool.
Instead of dishwashing liquid, you can also use lemon juice, white vinegar or a dishwashing tablet dissolved in water (leave to work as long as needed).
To facilitate cleaning (pre-cleaning), place the whisk in the empty bowl, pour 0.7l of water, a few drops of dishwashing liquid, lock the lid with the cap, then start the robot on speed 7 at 100°C for 3 minutes. When the appliance is in warm mode (beep sound), stop it and finish cleaning the mixer under the tap. (This applies to all 4 accessories).
For safety reasons, it is recommended to always store the Ultrablade chopping knife in the bowl when not using the robot (sharpened blades). The other accessories can be stored in a drawer or cupboard. CAUTION: The kneading/crushing knife is also sharp.
Your product is not connected to the WiFi (via the modem or via a mobile phone). Therefore, you can only access the 250 recipes contained in your product. We advise you to check that WiFi is activated on your modem/phone and to get closer to your modem/phone. We remind you that your product cannot connect to a 5GHz WiFi network, a WiFi network with a password containing special characters, as well as open WiFi networks (which do not require a password).
Your product is connected to the WiFi (via modem, mobile phone,...), but not connected to the database. Therefore, you can only access the 250 recipes contained in your product.
Your product is connected to the WiFi (via modem, mobile phone,...) and to the database. As a result, you can access more than 1,500 recipes.
• Check that the opening handle is in the open position before moving the lid to the closed position (open padlock). • Check that the nut of the metal lid is quite tight. • Check that the violet ball cap (located on the top of the metal lid) is in the correct locked position (closed padlock). • If you are at the end of cooking and you want to close the lid, wait until the hot vapours have dissipated before closing the lid. • Check for foreign bodies between the bowl and the heating plate. Remove the bowl and check that the heating plate, the central element and the underside of the bowl are clean. Also check that the central element can move freely. • The bowl may be deformed (after an impact, fall...). The bowl must be changed at an authorised service centre.
1. Check that the appliance is not in standby mode by pressing the rotary knob. 2. Make sure that the power cable is connected to the power supply. 3. If the product is powered, unplug the power cord for 10 - 15 seconds and then plug it back in. If the problem persists, contact our customer service or take your appliance to an approved service centre.
To view the images, it is necessary to authorize the downloading of photos via a Wi-Fi connection. This validation takes place at the initial startup of the device. This setting can be changed in the "Settings" section of the Cookeo.
The appliance has switched into overheating safety mode. Leave it to cool for 30 minutes. Before you use it again, reduce the amount of preparation to be mixed.
The appliance switched into safety mode because it detected significant changes. Make sure you are using the recommended speed and the appropriate accessory. Check that the appliance is stable (resting on its rubber feet) and the work surface is quite rigid.
Yes, some programms require the keep warm phase to continue (in order to keep the food in good condition, prevent skin forming, or the food sticking to the bottom of the bowl).
To whisk egg whites, you must use the lid without the stopper and use the whisk attachment. Also, it is important that the bowl is completely clean with no traces of fat or oil. CAUTION: Do not exceed Speed 7.
You can cool the bowl before making the recipe by crushing 10 ice cubes using "pulse" with the kneading/grinding blade, then empty the bowl, wipe it dry and immediately make the sorbet recipe.
The recipes were tested with ingredients at room temperature (20°C), It is possible that some recipes require 2 to 3 minutes of additional cooking if the ingredients (milk, eggs…) are from the refrigerator.
These are called "witness lines", where plastic material is left over after the molding process. There is no risk of cracks; you can continue to use your lid without worry.
This is a temporary phenomenon that won't affect the lifespan of your appliance. It will fade or disappear once the detachable spindle has been used and cleaned a few times (please refer to the “Cleaning the Appliance” section).
The heating resistor does not cover the entire bowl bottom surface. There is a hot zone on the left (when positioned in front of the appliance), and a less hot zone on the right.
Don't worry, like most LCD screens, the one on your appliance is sensitive to static electricity. As a result, traces of light can appear when you wipe your screen with a cloth for example. These luminous traces disappear after a few moments. This is a normal phenomenon that does not affect the operation or service life of your appliance.
Check that you do not exceed the maximum quantities of ingredients specified in the instructions for use, and that you use the speed and accessory appropriate to your recipe. If after these checks the problem persists, take your product to an authorized repairer.
• Make sure that the power cable is properly plugged into the mains supply. • Check that the device is not in standby mode by pressing the "OK" button. • Check that the On/Off switch on the base at the back is in the "I" position.
If the problem persists, take your device to an authorized repair centre.
Simply plug in your device and toggle the 'I/O' switch to 'I', the cover will unlock. We recommend that you do not turn off your device by unplugging the power plug, but use the 'O/I' switch.
If an error screen appears on the product please follow the instructions indicated. If necessary, you can refer to your product's manual for more information.
6 jars set (ref. XA606000): You can place 4 jars underneath and 2 jars on top. Be careful to place the two upper jars towards the front to prevent them from tipping over or hindering the lid from closing.
8 jars set (ref. XA6140E0): You can place the 8 jars with the 2 supports of 4 jars one on top of the other in the bowl.
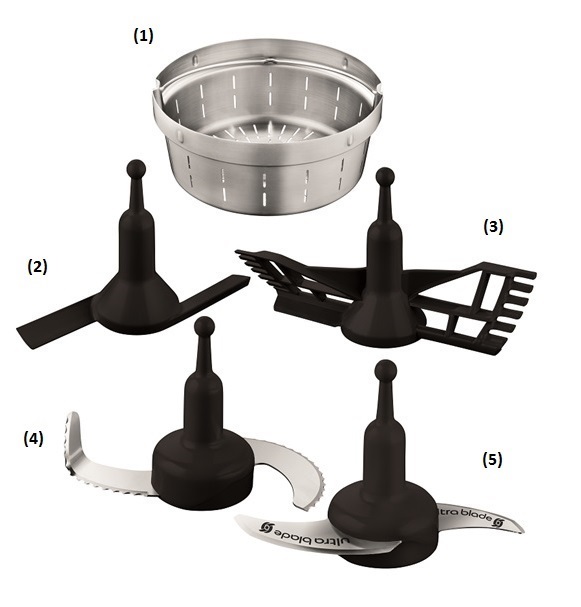
The following accessories are included with your appliance:
• Steaming basket (1) The steaming basket can be used to steam vegetables, fish or meat and to make soups with chunks.
• Mixer (2) It mixes cooked dishes without damaging the ingredients (browned dishes, stews, risottos, ratatouilles, chutneys and pulses).
• Beater (3) It is used for mayonnaise, whipped cream, sauces, creams and dressings (mashed potatoes, polenta...), whisking egg whites.
• Kneading/crushing knife (4) It kneads white bread dough, special breads, short crust pastry, biscuit dough, risen dough (brioche, kouglof...), light batters (cake mixture...). You can also make pancake/waffle batter with this accessory. It crushes nuts, chops hard products and crushes ice.
• Ultrablade cutting knife (5) It mixes (soups, fruit purees) and chops (vegetables, meat, fish). Do not use this accessory to chop hard products, use the kneading/crushing knife to do this.


 The product is not connected.
 The product is connecting.
 The product is connected.
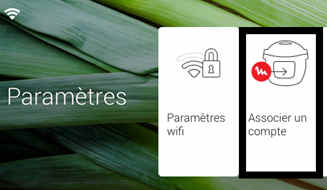

 Cookies are used for audience measurement and personalization to help us improve your use of the product.